이렇게 다운 받은 다음 cmd창이나 bash창을 통해 cocos2d-x파일의 압축을 푼 경로로 이동하여 다음 명령어를 입력해주자.
python setup.py
이렇게 해주면 입력하라는 창이 나올텐데 이것은 SDK 경로를 입력하는 창으로 당장은 필요하지 않기 때문에 Enter를 눌러 넘어가주자.
이렇게 해준다음 cocos 명령어를 통해 프로젝트를 생성하면 된다. 명령어는 위와 동일하게 cmd창이나 bash창에 입력하면 된다. 중요한 점은 이때 프로젝트는 cocos2d-x의 파일을 압축푼 곳에 생성해야 올바르게 작동한다는 점이다. 나는 projects라는 새로운 폴더를 만들고 이곳에 프로젝트를 생성해주었다.
C:\cocos2d-x-3.17.2\projects
cocos new [프로젝트 이름] -p [패키지 이름] -l [언어] -d [경로]
이렇게 만들어준 다음 proj.win32 폴더로 가서 sln파일을 열어주고 실행해보았을 때 cocos2d-x 아이콘과 화면이 등장하면 성공이다.
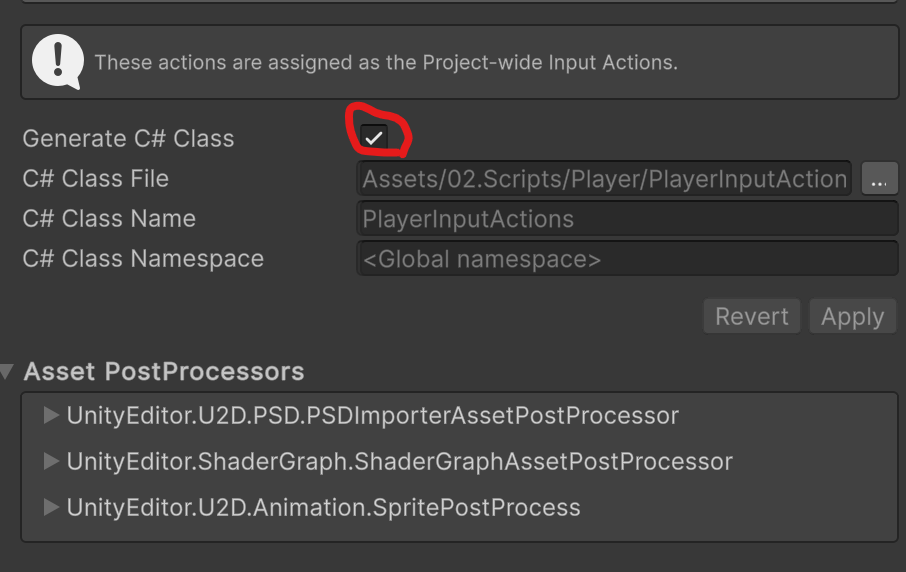
우선 InputAction에서 Generate C# class를 켜주고 Apply해서 코드로 불러낼 수 있도록 해주자.
이렇게 해준다음 Player 클래스를 생성하여 매핑된 Actions가 작동될 때 실행될 함수를 할당해주자.
우선 입력을 받아올 때 입력 이벤트의 context를 Vector2로 읽어드려서 어떤 방향에서의 입력인지 알아내고 이를 저장한다. 저장한 값이 0보다 크다면 해당 방향으로 이동을 시작하게 한다. 이때 키 입력이 끝났을 때 다시 입력값을 0으로 초기화 해주어야 정상적으로 작동한다.
✔ 문자열을 입력 스트림으로 변환하여 cin처럼 사용할 수 있음. ✔ 공백을 기준으로 문자열을 분리하여 읽을 때 유용함.
#include<iostream>#include<sstream>#include<string>usingnamespace std;
intmain(){
string input = "123 456 789";
istringstream iss(input); // 문자열을 입력 스트림으로 변환int num;
while (iss >> num) { // 공백 기준으로 숫자 추출
cout << num << endl;
}
return0;
}
2. ostringstream (출력 스트림, cout처럼 string에 출력)
✔ 문자열을 생성 및 조합할 때 사용. ✔ cout처럼 데이터를 추가할 수 있음. ✔ += 연산자보다 빠르게 문자열을 결합하는 방법 중 하나.
#include<iostream>#include<sstream>#include<string>usingnamespace std;
intmain(){
ostringstream oss; // 출력 스트림 생성
oss << "Hello, " << "World! " << 2024; // 여러 개의 데이터를 추가
string result = oss.str(); // 최종 문자열 변환
cout << result << endl; // 출력return0;
}
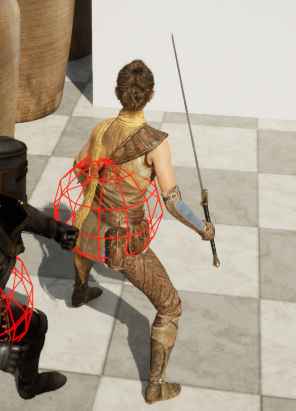
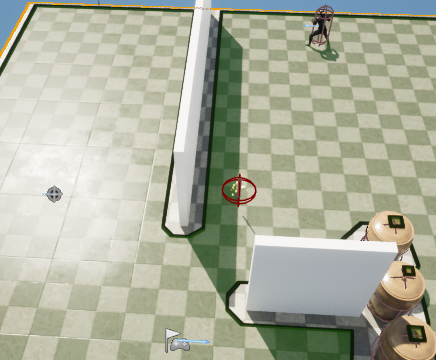
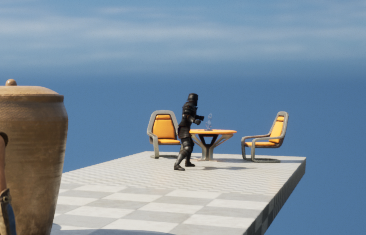
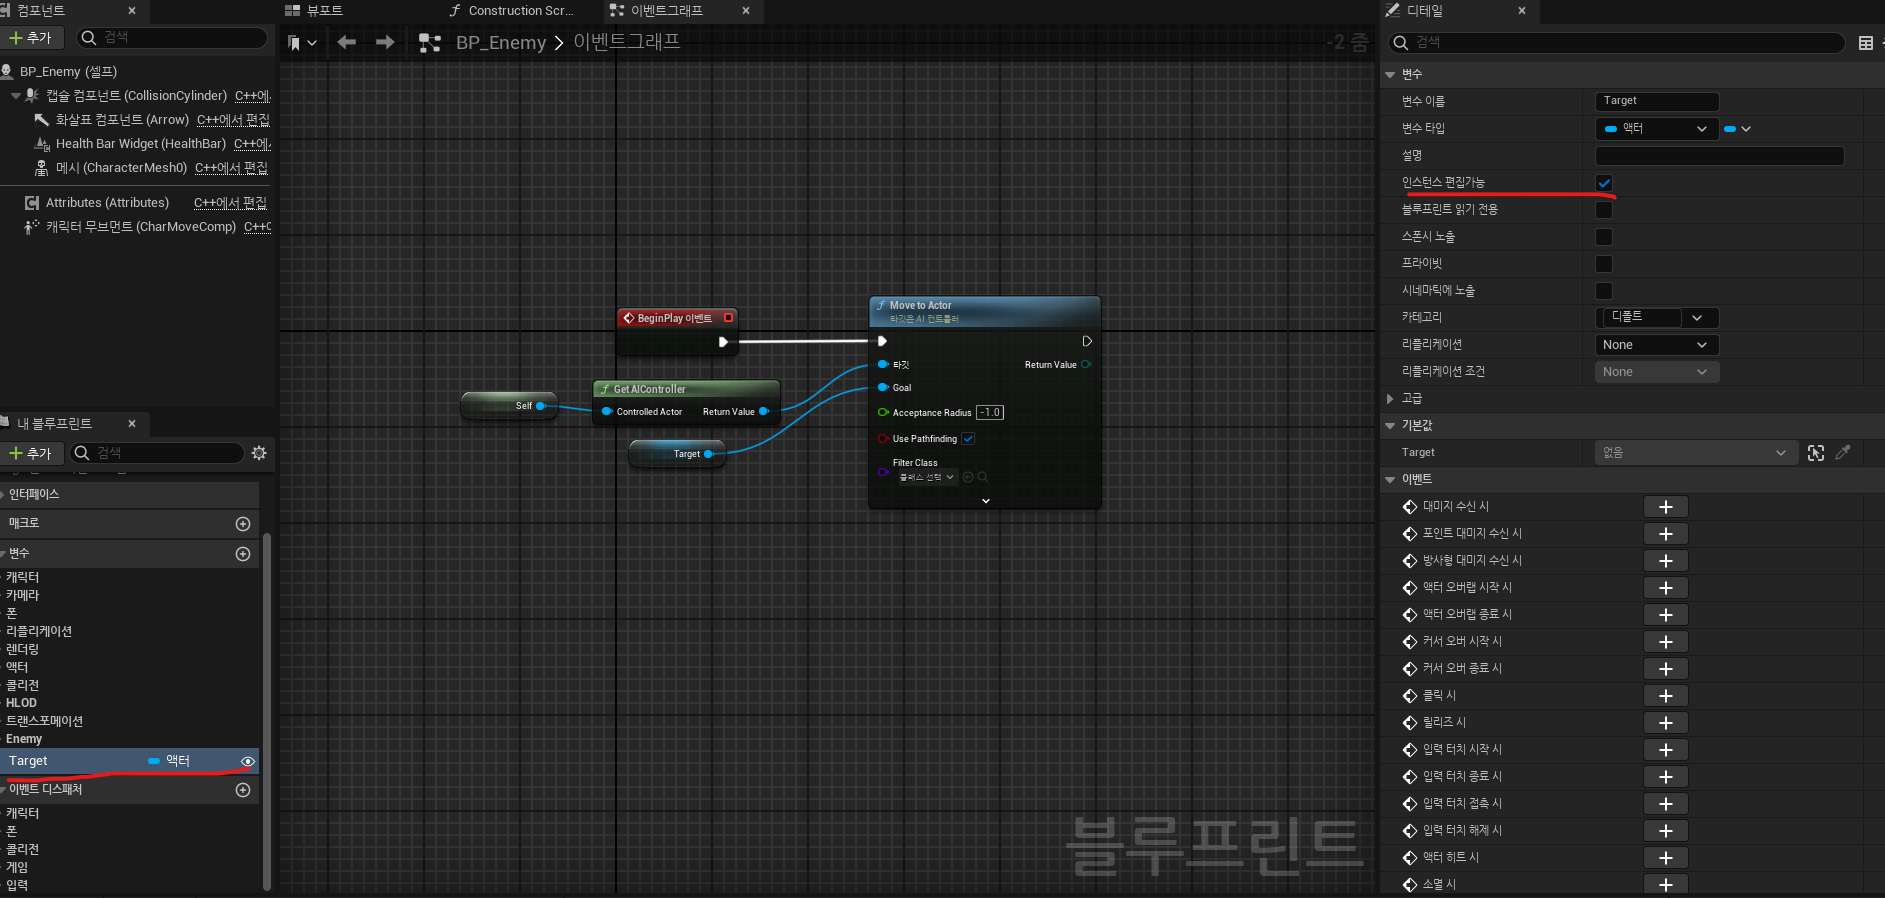
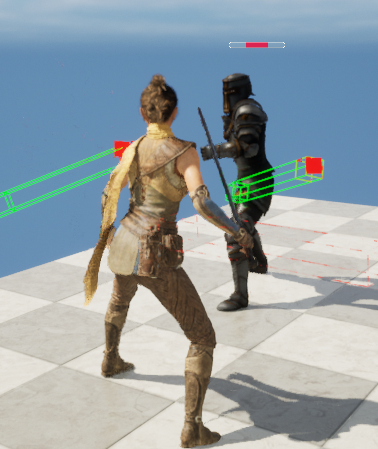
이제 여기서 Attack State로 바꾸고 Attack을 할 수 있게 Attack Radius를 지정해주어야 한다. 그리고 이제 CheckCombatTarget함수에서 플레이어와의 거리를 측정해서 Patrol Chase Attack상태가 나눠지도록 조건문을 구성해주자. 이때 PawnSeen함수에서 공격상태가 아닐때만 Chase하도록 해주자.
보드는 모든 카드의 위치를 관리해주고 룰을 결정해준다. 카드는 4*5배열로 배치되게 하였다.
Board.cs
using UnityEngine;
using System.Collections.Generic;
using System.Linq;
publicclassBoard : MonoBehaviour
{
[SerializeField] private GameObject cardPrefab;
[SerializeField] private Sprite[] cardSprites; // 카드 앞면 (1~6번 이미지)private List<Card> cards = new List<Card>();
private List<Card> selectedCards = new List<Card>(); // 선택된 카드들privateint rowCount = 5; //세로privateint colCount = 4; //가로privatefloat xStart = -2.1f;
privatefloat yStart = 3.3f;
privatefloat xSpacing = 1.4f;
privatefloat ySpacing = -1.8f;
privatevoidAwake(){
cardPrefab = Resources.Load<GameObject>("Prefabs/Card/Card");
LoadSprites();
ShuffleCards();
InitBoard();
}
voidLoadSprites(){
// Resources 폴더에서 "Sprites/0~9" 로드
cardSprites = new Sprite[10];
for (int i = 0; i < 10; i++)
{
cardSprites[i] = Resources.Load<Sprite>($"Sprites/Back/{i}");
}
}
publicvoidShuffleCards(){
List<Sprite> tempSprites = new List<Sprite>();
// 0~9번 카드 각각 2장씩 추가
foreach (var sprite in cardSprites)
{
tempSprites.Add(sprite);
tempSprites.Add(sprite);
}
// 랜덤 섞기
tempSprites = tempSprites.OrderBy(x => Random.value).ToList();
// cards 리스트에 카드 추가
cards.Clear();
for (int i = 0; i < tempSprites.Count; i++)
{
GameObject newCard = Instantiate(cardPrefab, Vector3.zero, Quaternion.identity, this.transform);
Card card = newCard.GetComponent<Card>();
card.SetCard(tempSprites[i], this);
cards.Add(card);
}
}
publicvoidInitBoard(){
int index = 0;
for (int i = 0; i < rowCount; i++)
{
for (int j = 0; j < colCount; j++)
{
if (index >= cards.Count) return; // 카드 개수 초과 방지// 위치 설정
Vector3 pos = newVector3(xStart + (xSpacing * j), yStart + (ySpacing * i), 0);
// 기존에 생성된 카드 객체를 위치만 변경
cards[index++].transform.position = pos;
}
}
}
publicvoidSelectCard(Card card){
if (selectedCards.Contains(card) || selectedCards.Count >= 2)
return;
selectedCards.Add(card);
if (selectedCards.Count == 2)
{
CheckMatch();
}
}
voidCheckMatch(){
if (selectedCards.Count < 2) return; // 두 장 선택되지 않으면 비교 불가if (selectedCards[0].GetSprite() == selectedCards[1].GetSprite())
{
// 같은 카드라면 유지
selectedCards.Clear();
Managers.Audio.PlaySound("Match"); // 카드 맞추면 효과음 재생!
}
else
{
// 다른 카드라면 1초 후 다시 뒤집기Invoke(nameof(ResetCards), 1f);
}
}
voidResetCards(){
foreach (var card in selectedCards)
{
card.FlipBack();
}
selectedCards.Clear();
}
publicintGetSelectedCardCount()=> selectedCards.Count;
public List<Card> GetCards()=> cards;
}
실제로 배치된 모습을 보면 다음과 같다
이제 GameManager를 통해 이 보드의 초기화 함수인 Init을 호출해주고 코루틴 함수를 통해 모든 카드를 오픈하고 다시 뒤집어서 유저가 게임을 진행할 수 있게 한다. 또한 시간을 관리해주고 게임이 이겼는지 확인해준다.
GamaManager.cs
using System;
using System.Collections;
using System.Collections.Generic;
using TMPro;
using UnityEngine;
using UnityEngine.PlayerLoop;
using UnityEngine.UI;
usingstatic UnityEngine.RuleTile.TilingRuleOutput;
publicclassGameManager
{private Board board;
private List<Card> cards;
privatebool isGameActive = false;
privatefloat gameTime = 60f; // 총 게임 시간privatefloat remainingTime; // 현재 남은 시간private Slider timeSlider;
private Image sliderFill; // 슬라이더의 Fill 색상 변경용private TextMeshProUGUI timeText; // 남은 시간을 표시하는 UIpublic event Action<float> OnTimeUpdated;
publicvoidInit(){
board = GameObject.Find("Board")?.GetComponent<Board>();
timeSlider = GameObject.Find("TimeOutSlider")?.GetComponent<Slider>();
timeText = GameObject.Find("TimeOutText")?.GetComponent<TextMeshProUGUI>();
if (board == null || timeSlider == null || timeText == null)
{
Debug.LogError("GameManager 초기화 실패 - 필수 UI 요소가 없음.");
return;
}
// 게임 시작
isGameActive = true;
sliderFill = timeSlider.fillRect.GetComponent<Image>();
remainingTime = gameTime;
CoroutineHelper.StartCoroutine(StartGameSequence());
}
IEnumerator StartGameSequence(){
// 보드가 초기화될 시간을 기다림yield returnnewWaitForSeconds(0.3f);
cards = board.GetCards();
// 모든 카드 공개 (처음 1초 동안)
foreach (var card in cards)
{
card.FlipCard();
}
yield returnnewWaitForSeconds(1.5f);
// 다시 뒤집기
foreach (var card in cards)
{
card.FlipBack();
}
yield returnnewWaitForSeconds(0.3f);
// 타이머 UI 활성화
timeSlider.gameObject.SetActive(true);
timeText.gameObject.SetActive(true);
Managers.Audio.PlayBGM("BGM");
CoroutineHelper.StartCoroutine(UpdateTimer());
}
IEnumerator UpdateTimer(){
while (remainingTime > 0 && isGameActive)
{
remainingTime -= Time.deltaTime;
timeSlider.value = remainingTime;
OnTimeUpdated?.Invoke(remainingTime); // UI 업데이트 호출if (CheckWinCondition())
{
GameOver(true);
yield returnnewWaitForSeconds(1f);
yield break;
}
yield return null;
}
if (remainingTime <= 0)
{
GameOver(false);
}
}
privateboolCheckWinCondition(){
foreach (var card in board.GetCards())
{
if (!card.IsFlipped()) returnfalse;
}
returntrue;
}
privatevoidGameOver(bool isWin){
isGameActive = false;
Time.timeScale = 0.0f;
CoroutineHelper.StartCoroutine(GameOverSequence(isWin));
}
private IEnumerator GameOverSequence(bool isWin){
yield returnnewWaitForSecondsRealtime(0.5f); // 0.5초 딜레이 후 실행// DOTween의 모든 트위닝을 제거
DG.Tweening.DOTween.KillAll();
if (isWin)
{
Managers.UI.ShowPopupUI<UI_Success>();
}
else
{
Managers.UI.ShowPopupUI<UI_GameOver>();
}
}
}
그리고 게임에 필요한 UI는 UI_Game으로 묶어서 관리해주도록 했다. 옵저버 패턴을 사용하여 시간이 지남에 따라 색깔이 바뀌고 슬라이더의 바가 줄어들도록 구현했다. 이때 각 오브젝트의 이름과 Bind하는 enum 변수들의 이름이 같아야 정상적으로 Bind가 이루어진다.
UI_Game.cs
using System.Collections;
using System.Collections.Generic;
using TMPro;
using UnityEngine;
using UnityEngine.EventSystems;
using UnityEngine.UI;
publicclassUI_Game : UI_Scene
{
enumButtons
{
EscapeButton,
}
enumTexts
{
TimeOutText,
}
enumGameObjects
{
TimeOutSlider,
}
privatefloat gameTime = 60f; // 총 게임 시간publicoverridevoidInit(){
base.Init(); // 상위 클래스의 초기화 메서드 호출
Bind<Button>(typeof(Buttons));
Bind<TextMeshProUGUI>(typeof(Texts));
Bind<GameObject>(typeof(GameObjects));
GetObject((int)GameObjects.TimeOutSlider).GetComponent<Slider>().maxValue = gameTime;
GetObject((int)GameObjects.TimeOutSlider).GetComponent<Slider>().value = gameTime;
GetButton((int)Buttons.EscapeButton).gameObject.AddUIEvent(PauseOrResume);
Managers.Game.OnTimeUpdated += UpdateTimeUI;
}
voidPauseOrResume(PointerEventData eventData){
// 1. 뭐든지 열려있으면 다 닫기// 2. 아무것도 없으면 열기if (Managers.UI.GetStackSize() > 0)
Managers.UI.CloseAllPopupUI();
else
Managers.UI.ShowPopupUI<UI_PausePopup>();
}
privatevoidUpdateTimeUI(float time){
GetText((int)Texts.TimeOutText).text = Mathf.CeilToInt(time).ToString();
GetObject((int)GameObjects.TimeOutSlider).GetComponent<Slider>().value = time;
UpdateTimeColor(time);
}
privatevoidUpdateTimeColor(float time){
float normalizedTime = time / gameTime;
Color startColor = newColor(0.96f, 0.55f, 0.0f);
Color endColor = newColor(1.0f, 0.0f, 0.0f);
Color timeColor = Color.Lerp(endColor, startColor, normalizedTime);
GetText((int)Texts.TimeOutText).color = timeColor;
GetObject((int)GameObjects.TimeOutSlider).GetComponent<Slider>().fillRect.GetComponent<Image>().color = timeColor;
}
privatevoidOnDisable(){
Managers.Game.OnTimeUpdated -= UpdateTimeUI;
}
}
그리고 다양한 Mob이 있을 수 있기때문에 Mob이 가지고 있어야 할 함수와 변수를 남은 abstract 객체를 선언해주자. 그리고 기본적인 정보는 FlyWeight 패턴을 사용하여 Scriptable Object를 참조하도록 했다.
BaseMobController.cs
using System.Collections.Generic;
using UnityEngine;
public abstract classBaseMobController : MonoBehaviour
{
protected IMobState currentState;
public MobData mobData;
public IMobState GetCurrentState(){
return currentState;
}
public abstract voidChangeState(IMobState state);
public abstract floatGetDetectionRange();
public abstract floatGetAttackRange();
public abstract floatGetChasableRange();
public abstract Vector2 GetPatrolPointA();
public abstract Vector2 GetPatrolPointB();
public abstract voidSetDestination(Vector2 destination);
public abstract voidSetPatrolPoints(Vector2 pointA, Vector2 pointB);
public abstract boolIsPlayerDetected();
public abstract voidMove(Vector2 target);
}
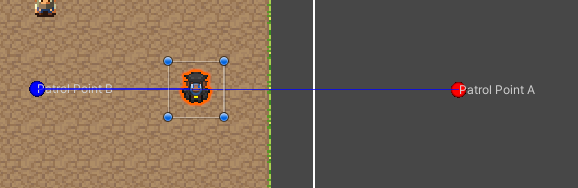
에디터를 수정해주려면 [CustomEditor(typeof(BaseMobController), true)] 이러한 코드를 클래스전에 선언해주어야한다. 또한 클래스에서 Editor 클래스를 상속받아 코드를 구현해야한다. setDirty를 통해 진행상황이 바로 저장되도록 구현하였다.
MobControllerEditor.cs
using UnityEditor;
using UnityEngine;
[CustomEditor(typeof(BaseMobController), true)] // 이제 모든 MobController 파생 클래스에 대해 이 에디터를 사용할 수 있습니다.publicclassMobControllerEditor : Editor
{
privatefloat _handleSize = 5f; // Scene view에서의 핸들 크기를 더 작게 조정publicoverridevoidOnInspectorGUI(){
base.OnInspectorGUI(); // 기존 인스펙터 GUI 요소를 그린다.
BaseMobController mob = (BaseMobController)target;
if (GUILayout.Button("Initialize Patrol Points"))
{
Vector2 center = mob.transform.position;
Vector2 pointA = center + newVector2(2f, 0f);
Vector2 pointB = center + newVector2(-2f, 0f);
mob.SetPatrolPoints(pointA, pointB);
//변경사항 적용
EditorUtility.SetDirty(mob);
}
}
protectedvoidOnSceneGUI(){
BaseMobController mob = (BaseMobController)target;
EditorGUI.BeginChangeCheck();
Vector3 pointAWorld = mob.GetPatrolPointA();
Vector3 pointBWorld = mob.GetPatrolPointB();
// 🔹 Scene 뷰 줌 레벨에 따라 핸들 크기 자동 조정float handleSize = HandleUtility.GetHandleSize(mob.transform.position) * 0.2f;
// 현재 상태에 따라 범위를 다르게 그리기
IMobState currentState = mob.GetCurrentState();
if (currentState is PatrolState)
{
DrawDetectionRange(mob);
DrawAttackRange(mob);
}
elseif (currentState is ChaseState)
{
DrawChasableRange(mob);
DrawAttackRange(mob);
}
elseif (currentState is AttackState)
{
DrawAttackRange(mob);
}
Handles.color = Color.red;
pointAWorld = Handles.FreeMoveHandle(pointAWorld, handleSize, Vector3.zero, Handles.SphereHandleCap);
Handles.Label(pointAWorld, "Patrol Point A");
Handles.color = Color.blue;
pointBWorld = Handles.FreeMoveHandle(pointBWorld, handleSize, Vector3.zero, Handles.SphereHandleCap);
Handles.Label(pointBWorld, "Patrol Point B");
if (EditorGUI.EndChangeCheck())
{
Undo.RecordObject(mob, "Change Patrol Points");
mob.SetPatrolPoints(pointAWorld, pointBWorld);
EditorUtility.SetDirty(mob);
}
Handles.DrawLine(pointAWorld, pointBWorld);
}
privatevoidDrawDetectionRange(BaseMobController mob){
Handles.color = Color.yellow;
Handles.DrawWireArc(mob.transform.position, Vector3.forward, Vector3.up, 360, mob.GetDetectionRange());
}
privatevoidDrawChasableRange(BaseMobController mob){
Handles.color = Color.yellow;
Handles.DrawWireArc(mob.transform.position, Vector3.forward, Vector3.up, 360, mob.GetChasableRange());
}
privatevoidDrawAttackRange(BaseMobController mob){
Handles.color = Color.red;
Handles.DrawWireArc(mob.transform.position, Vector3.forward, Vector3.up, 360, mob.GetAttackRange());
}
}
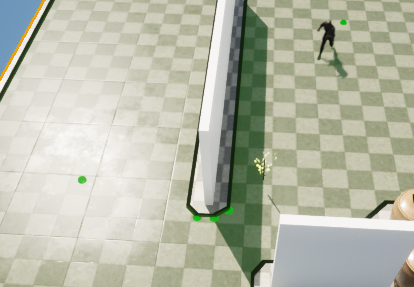
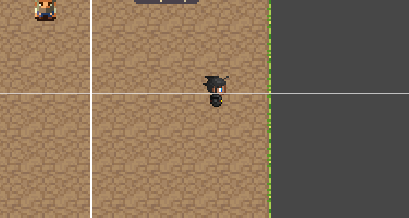
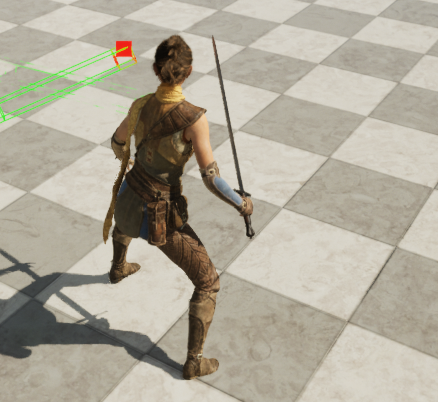
이렇게 해주면 Scene창에서 캐릭터의 Patorl Point를 눈으로 보고 직접 수정해줄 수 있으며 초기화해줄 수 있다.