
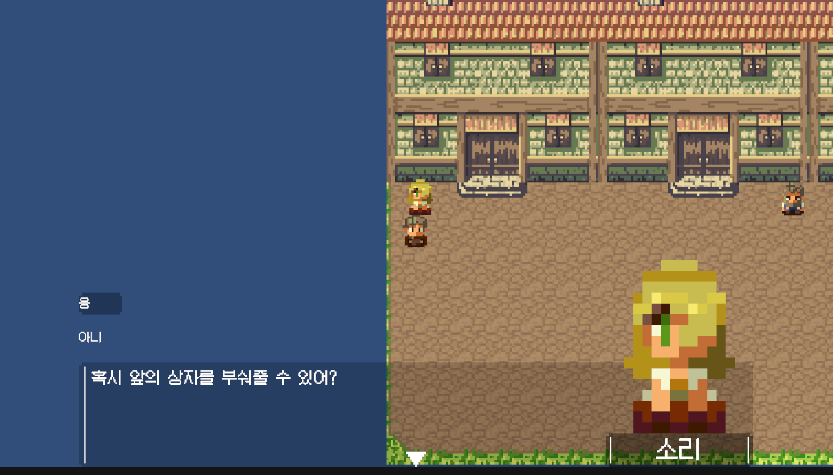
이전에 만들었던 대화 출력은 올바르게 되었으니 이제 대화창에서 선택지가 출력되고 이를 선택할 수 있게 만들어주자.
일단 저번에 만들었던 대화를 출력해주는 DialogueManager의 ContinueStory 함수를 수정해주자.
DialogueManager.cs
public void ContinueStory()
{
    if (currentStory == null) // Null 체크 추가
    {
        Debug.LogError("currentStory가 null입니다!");
        return;
    }

    if (currentStory.canContinue) // 더 보여줄 이야기가 있다면
    {
        popup.displayNameText.text = npcdata.getName();
        popup.portraitImage.sprite = npcdata.getPortrait();
        popup.dialogueText.text = currentStory.Continue(); // 한줄 출력
        DisplayChoices(); // 선택이 있으면 선택 출력
    }
    else
    {
        ExitDialogueMode();
    }
}
오류체크와 선택이 있다면 선택을 출력해주는 함수를 추가해줬다.
이 Display함수는 만약 선택이 있다면 선택의 개수만큼만 버튼을 활성화 시켜주고 나머지는 비활성화시켜준다. 그리고 마지막에 코루틴을 사용하여 첫 항목이 선택되게 한다. 이 코루틴이 있어야 선택이 정상적으로 작동한다.
DialogueManager.cs
 private void DisplayChoices()
 {
     if (popup == null) // Null 체크 추가
     {
         Debug.LogError("팝업 UI가 null입니다!");
         return;
     }

     List<Choice> currentChoices = currentStory.currentChoices;
     if (currentChoices.Count > popup.choices.Length) // 현재 선택지의 개수가 버튼의 개수보다 많으면 오류
     {
         Debug.LogError("More choices than ever");
     }

     int index = 0;
     foreach (Choice choice in currentChoices)
     {
         popup.choices[index].gameObject.SetActive(true);
         popup.choicesText[index].text = choice.text;
         index++;
     }

     for (int i = index; i < popup.choices.Length; i++)
     {
         popup.choices[i].gameObject.SetActive(false);
     }
     popup.choicep.SetActive(true);

     StartCoroutine(SelectFirstChoice());
 }
private IEnumerator SelectFirstChoice()
{
EventSystem.current.SetSelectedGameObject(null);
yield return new WaitForEndOfFrame();
EventSystem.current.SetSelectedGameObject(popup.choices[0].gameObject);
}
그리고 버튼에 OnclickEvent를 추가해주기 위해 MakeChoice함수를 추가하고 이를 Popup을 관리해주는 객체에서 사용하도록 하자.
DialogueManager.cs
public void makeChoice(int choice)
{
    if (currentStory == null) // Null 체크 추가
    {
        Debug.LogError("currentStory가 null입니다!");
        return;
    }

    currentStory.ChooseChoiceIndex(choice);
    ContinueStory();
}
UI_DialioguePopup.cs
private void Start()
{
    for (int i = 0; i < choices.Length; i++)
    {
        int id = i;
        choiceButton[i].onClick.AddListener(() => Managers.Dialogue.makeChoice(id));
    }
}
이렇게 해주면 이제 대화를 진행하면서 선택지가 있으면 선택지를 선택할 수 있게 된다.

이제 다음에는 이 선택지에 따라 퀘스트가 진행되게 만들어볼 것이다.
※매니저에서 코루틴을 사용하는 상황에서 만약 각 매니저가 통합매니저에서 싱글톤으로 관리되고 있다고 하면 사용할 때 New 키워드를 사용하면 nullreferenceexception 에러가 뜬다. 이를 방지하기 위해 GameObject에서 Getcomponent를 통해 해당 매니저를 가져와서 사용해야한다.
'게임공부 > Unity' 카테고리의 다른 글
| [C#][Unity][나만의 탑뷰 게임 만들기]4. 아이템 시스템 만들기 (0) | 2024.12.18 |
|---|---|
| [C#][Unity][나만의 탑뷰 게임 만들기]3. 퀘스트시스템 만들기-2 (1) | 2024.11.28 |
| [C#][Unity][나만의 탑뷰 게임 만들기]2. 대화 상호작용 만들기 (4) | 2024.11.06 |
| [C#][Unity][나만의 탑뷰 게임 만들기]1. 이동 및 타일맵 (2) | 2024.10.04 |
| [Unity][C#]개발꿀팁 모음 (1) | 2024.06.15 |