강의
학습 페이지
www.inflearn.com

뷰포트변환
물체가 월드 ~ 투영 변환을 거친 다음에 뷰포트 변환을 해주는 것으로 실제 화면에 표시되는 영역을 정의한다.
우리가 만약 3D게임에서 물체를 클릭한다고 했을 때 물체가 선택되는 것은 3D세계가 뷰포트인 2D로 변환되어 보여지는데 이 2D화면에서 우리가 선택한 물체인 3D가 선택되는 것으로 그냥 이루어지는 것이 아니라는 것을 알 수 있다.
클릭할 때 생각해보면 우리가 누른 좌표를 3D 좌표로 바꿀 수 있어야 한다. 만약 800 600의 정중앙인 400 300의 좌표를 3D 좌로 바꿔보면 깊이값을 더 해줘야하는데 이 깊이값을 어떤 값으로 정해줄 지가 문제이다.
UI도 3D세상에 2D인 UI를 넣는 것이다. 구현하는 방법에는 3D물체를 직교투영 카메라로 찍는 방법과 후처리를 해서 스크린 영역에 붙여주는 방법등 여러 방법이 있다.
결국에는 2D에서 3D로 넘어가는 것이 필수적이다 라는 것이다.
우리가 만든 DX코드에서는 카메라에 넣는것도 방법이 될수 있겠지만 지금은 최종적인 상태인 뷰포트라는 것을 관리해서 기능을 추가해주자. 3D에서 2D 변환을 하기 위해서 프로젝션을 하기 위해 중요한 역활을 하는 것이 뷰포트이기 때문이다.
이를 위해서 ViewPort라는 별도의 클래스를 만들어주자. 이때 클래스 변수 중에 D3D11_VIEWPORT라는 구조체에 이미 필요한 정보가 다 있기 때문에 이를 활용해주자. 프로젝션 공식은 D3D11Math 라이브러리를 활용해주자.
현재 위치가 주어졌을 때, world, View, Projection 행렬을 적절히 활용하여 2D -> 3D , World까지 가는 행렬또는 View로 넘어가는 것을 만들어주면 된다. 연산은 밑의 M 공식대로 변수값을 적용시켜주면 된다.
Viewport.h
#pragma once

class Viewport
{
public:
	Viewport();
	Viewport(float width, float height, float x = 0, float y = 0, float minDepth = 0, float maxDepth = 1);
	~Viewport();

	void RSSetViewport();
	void Set(float width, float height, float x = 0, float y = 0, float minDepth = 0, float maxDepth = 1);

	float GetWidth() { return _vp.Width; }
	float GetHeight() { return _vp.Height; }

	//2D-> 3D
	Vec3 Project(const Vec3& pos, const Matrix& W, const Matrix& V, const Matrix& P);
	//3D-> 2D
	Vec3 Unproject(const Vec3& pos, const Matrix& W, const Matrix& V, const Matrix& P);

private:
	D3D11_VIEWPORT _vp;
};
Viewport.cpp
#include "pch.h"
#include "Viewport.h"

Viewport::Viewport()
{
	Set(800, 600);
}

Viewport::Viewport(float width, float height, float x, float y, float minDepth, float maxDepth)
{
	Set(width, height, x, y, minDepth, maxDepth);
}

Viewport::~Viewport()
{

}

void Viewport::RSSetViewport()
{
	DC->RSSetViewports(1, &_vp);
}

void Viewport::Set(float width, float height, float x, float y, float minDepth, float maxDepth)
{
	_vp.TopLeftX = x;
	_vp.TopLeftY = y;
	_vp.Width = width;
	_vp.Height = height;
	_vp.MinDepth = minDepth;
	_vp.MaxDepth = maxDepth;
}

//3D -> 2D
Vec3 Viewport::Project(const Vec3& pos, const Matrix& W, const Matrix& V, const Matrix& P)
{
	Matrix wvp = W * V * P;
	Vec3 p = Vec3::Transform(pos, wvp);

	//행렬연산공식
	p.x = (p.x + 1.0f) * (_vp.Width / 2) + _vp.TopLeftX;
	p.y = (-p.y + 1.0f) * (_vp.Height / 2) + _vp.TopLeftY;
	p.z = p.z * (_vp.MaxDepth - _vp.MinDepth) + _vp.MinDepth;

	return p;
}

//2D->3D  깊이값은 있음
Vec3 Viewport::Unproject(const Vec3& pos, const Matrix& W, const Matrix& V, const Matrix& P)
{
	Vec3 p = pos;

	p.x = 2.f * (p.x - _vp.TopLeftX) / _vp.Width - 1.f;
	p.y = -2.f * (p.y - _vp.TopLeftY) / _vp.Height + 1.f;
	p.z = ((p.z - _vp.MinDepth) / (_vp.MaxDepth - _vp.MinDepth));

	Matrix wvp = W * V * P;
	Matrix wvpInv = wvp.Invert();

	p = Vec3::Transform(p, wvpInv);
	return p;
}
이렇게 만들어주고 Graphics에서 ViewPort에 해당하는 부분을 수정해주자.
Graphics.h
#pragma once
#include "Viewport.h"

//그려지는 것에 필요한 것들
class Graphics
{
	DECLARE_SINGLE(Graphics);

public:
	void SetViewport(float width, float height, float x = 0, float y = 0, float minDepth = 0, float maxDepth = 1);
	Viewport& GetViewport() { return _vp; }

private:
	// Misc
	//D3D11_VIEWPORT _viewport = { 0 };
	Viewport _vp;
};
Graphics.cpp
#include "pch.h"
#include "Graphics.h"

void Graphics::Init(HWND hwnd)
{
	_hwnd = hwnd;

	CreateDeviceAndSwapChain();
	CreateRenderTargetView();
	CreateDepthStencilView();
	SetViewport(GAME->GetGameDesc().width, GAME->GetGameDesc().height);
}

void Graphics::RenderBegin()
{
	_deviceContext->OMSetRenderTargets(1, _renderTargetView.GetAddressOf(), _depthStencilView.Get());
	_deviceContext->ClearRenderTargetView(_renderTargetView.Get(), (float*)(&GAME->GetGameDesc().clearColor));
	_deviceContext->ClearDepthStencilView(_depthStencilView.Get(), D3D11_CLEAR_DEPTH | D3D11_CLEAR_STENCIL, 1, 0);
	_vp.RSSetViewport();
}

void Graphics::SetViewport(float width, float height, float x /*= 0*/, float y /*= 0*/, float minDepth /*= 0*/, float maxDepth /*= 1*/)
{
	_vp.Set(width, height, x, y, minDepth, maxDepth);
}
이걸 테스트할 수 있도록 메인코드를 만들어주자.
ViewportDemo.cpp
#include "pch.h"
#include "ViewportDemo.h"
#include "RawBuffer.h"
#include "TextureBuffer.h"
#include "Material.h"
#include "SceneDemo.h"
#include "GeometryHelper.h"
#include "Camera.h"
#include "GameObject.h"
#include "CameraScript.h"
#include "MeshRenderer.h"
#include "Mesh.h"
#include "Material.h"
#include "Model.h"
#include "ModelRenderer.h"
#include "ModelAnimator.h"
#include "Mesh.h"
#include "Transform.h"
#include "VertexBuffer.h"
#include "IndexBuffer.h"
#include "Light.h"
#include "Graphics.h"
void ViewportDemo::Init()
{
_shader = make_shared<Shader>(L"23. RenderDemo.fx");
// Camera
{
auto camera = make_shared<GameObject>();
camera->GetOrAddTransform()->SetPosition(Vec3{ 0.f, 0.f, -5.f });
camera->AddComponent(make_shared<Camera>());
camera->AddComponent(make_shared<CameraScript>());
CUR_SCENE->Add(camera);
}
// Light
{
auto light = make_shared<GameObject>();
light->AddComponent(make_shared<Light>());
LightDesc lightDesc;
lightDesc.ambient = Vec4(0.4f);
lightDesc.diffuse = Vec4(1.f);
lightDesc.specular = Vec4(0.1f);
lightDesc.direction = Vec3(1.f, 0.f, 1.f);
light->GetLight()->SetLightDesc(lightDesc);
CUR_SCENE->Add(light);
}
// Material
{
shared_ptr<Material> material = make_shared<Material>();
material->SetShader(_shader);
auto texture = RESOURCES->Load<Texture>(L"Veigar", L"..\\Resources\\Textures\\veigar.jpg");
material->SetDiffuseMap(texture);
MaterialDesc& desc = material->GetMaterialDesc();
desc.ambient = Vec4(1.f);
desc.diffuse = Vec4(1.f);
desc.specular = Vec4(1.f);
RESOURCES->Add(L"Veigar", material);
}
// Mesh
for (int32 i = 0; i < 10; i++)
{
auto obj = make_shared<GameObject>();
obj->GetOrAddTransform()->SetLocalPosition(Vec3(rand() % 10, 0, rand() % 10));
obj->AddComponent(make_shared<MeshRenderer>());
{
obj->GetMeshRenderer()->SetMaterial(RESOURCES->Get<Material>(L"Veigar"));
}
{
auto mesh = RESOURCES->Get<Mesh>(L"Cube");
obj->GetMeshRenderer()->SetMesh(mesh);
obj->GetMeshRenderer()->SetPass(0);
}
CUR_SCENE->Add(obj);
}
}
void ViewportDemo::Update()
{
static float width = 800.f;
static float height = 600.f;
static float x = 0.f;
static float y = 0.f;
ImGui::InputFloat("Width", &width, 10.f);
ImGui::InputFloat("Height", &height, 10.f);
ImGui::InputFloat("X", &x, 10.f);
ImGui::InputFloat("Y", &y, 10.f);
GRAPHICS->SetViewport(width, height, x, y);
}
void ViewportDemo::Render()
{
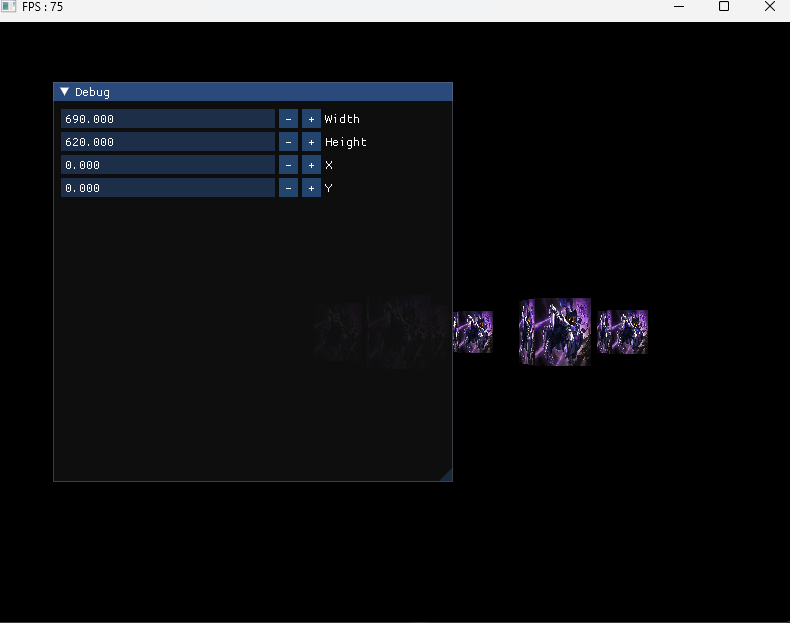
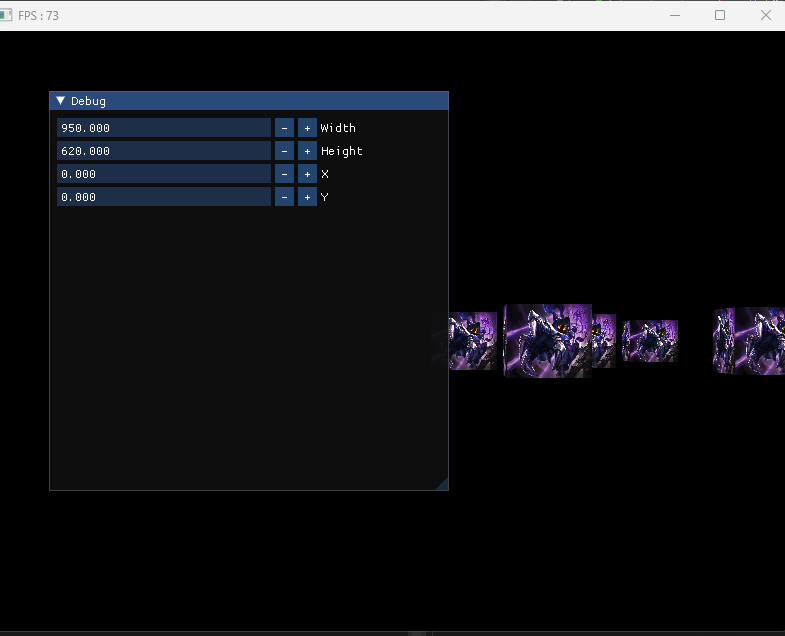
}실행시켜보았을 때 만약 뷰표트의 크기를 줄이면 시야각도 줄어드는 효과가 난다. 결국 뷰포트는 -1 ~ 1로 넘어온 뷰를
얼마만큼의 뷰로 렌더링해줄 것인지를 이야기하는 것이다.
이제 뷰포트변화를 보았으니 물체가 프로젝션을 했을 때 어떻게 동작하는지 코드를 통해 알아보자. 이를 위해 물체는 하나로 설정하고 0,0,0에 배치해주자.
프로젝션은 임의의 점(ImGui사용)을 연산해주자.
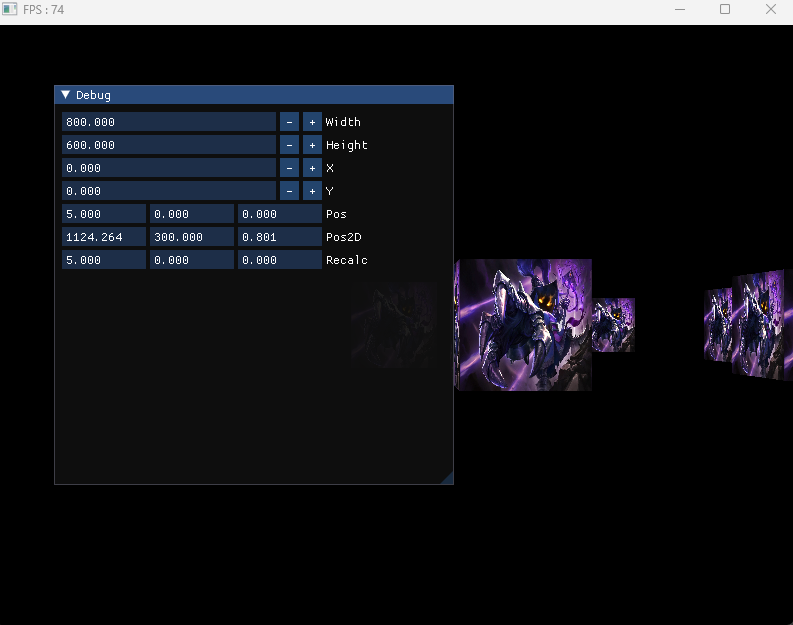
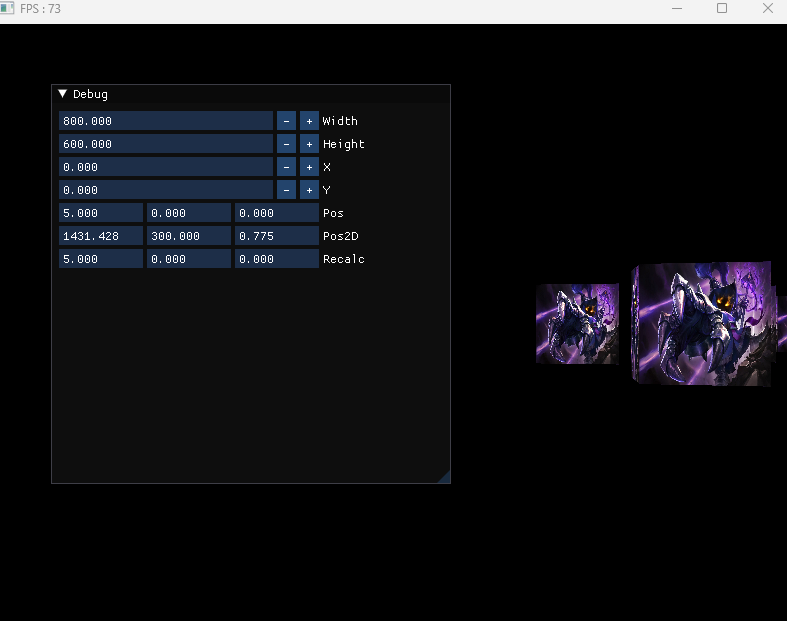
중요한 것은 2D->3D로 갔다가 다시 3D->2D로 가면 원래좌표가 뜬다는 것이다. 그리고 보는 방향에 따라 중앙 Pos2D값이 달라지는 것을 볼 수 있다. 깊이값은 0~1까지 나타난다.
'게임공부 > Directx11' 카테고리의 다른 글
| [Directx11][C++][3D]28. Collision(Box) & Picking (1) | 2024.10.06 |
|---|---|
| [Directx11][C++][3D]27. Collision(Sphere) (3) | 2024.10.06 |
| [Directx11][C++][3D]25. RenderManager 분할 (3) | 2024.10.03 |
| [Directx11][C++][3D]24. StructureBuffer (0) | 2024.10.02 |
| [Directx11][C++][3D]23. TextureBuffer (4) | 2024.10.02 |