이때 어떤 버퍼를 통해 값을 넣어주면 될지 생각해보아야하는데 상수버퍼는 많은 데이터를 넣어주지는 못한다. 그렇기 때문에 다른 방법을 사용해주어야한다. 이때 텍스처에 정보를 담아서 전달해주도록하자. 이 텍스처에는 모든 애니메이션, 본의 transform정보를 넣어주자
이를 위해 KeyFrame 과 Transform을 저장할 구조체를 선언해주고 이를 채우고 텍스처로 만드는 함수를 만들어주자. 이때 텍스처를 GPU에 넘겨주기 위하여 쉐이더리소스뷰도 사용해주자.
일단 우리가 custom file로 만들어준 정보를 가져오기 위해 본과 프레임을 순회하면서 특정 본의 특정 프레임의 SRT를 하나의 Transform으로 묶어서 vector에 누적하여 저장해주자. 이때의 Matrix는 상위노드에 대한 상대 Matrix이다.
이 Transfrom과 기본자세인 T에서의 정점의 상대좌표, Root node로 가는 Transform을 가진 Transform의 역행렬을 구한 다음 우리가 구한 SRT를 곱해두면 된다.
한 정점에 영향을 주는 뼈가 최대 4개이기 때문에 이 작업을 4번 해주어야하지만 핵심은 위와 같다.
ModelAnimator.cpp
void ModelAnimator::CreateAnimationTransform(uint32 index)
{
	vector<Matrix> tempAnimBoneTransforms(MAX_MODEL_TRANSFORMS, Matrix::Identity);

	shared_ptr<ModelAnimation> animation = _model->GetAnimationByIndex(index);

	for (uint32 f = 0; f < animation->frameCount; f++)
	{
		for (uint32 b = 0; b < _model->GetBoneCount(); b++)
		{
			shared_ptr<ModelBone> bone = _model->GetBoneByIndex(b);

			Matrix matAnimation;

			shared_ptr<ModelKeyframe> frame = animation->GetKeyframe(bone->name);
			if (frame != nullptr)
			{
				ModelKeyframeData& data = frame->transforms[f];

				Matrix S, R, T;
				S = Matrix::CreateScale(data.scale.x, data.scale.y, data.scale.z);
				R = Matrix::CreateFromQuaternion(data.rotation);
				T = Matrix::CreateTranslation(data.translation.x, data.translation.y, data.translation.z);

				matAnimation = S * R * T;
			}
			else
			{
				matAnimation = Matrix::Identity;
			}

			// [ !!!!!!! ]
			Matrix toRootMatrix = bone->transform;
			Matrix invGlobal = toRootMatrix.Invert();

			int32 parentIndex = bone->parentIndex;

			Matrix matParent = Matrix::Identity;
			if (parentIndex >= 0)
				matParent = tempAnimBoneTransforms[parentIndex];

			tempAnimBoneTransforms[b] = matAnimation * matParent;

			// 결론
			_animTransforms[index].transforms[f][b] = invGlobal * tempAnimBoneTransforms[b];
		}
	}
}
이렇게 해주면 데이터가 매우 크기때문에 텍스처리소스를 만들어주고 이를 묘사해주는 SRV- 쉐이더리소스뷰를 만들어서
GPU로 넘겨주도록하자.
이때 행렬은 float가 16개 있는 것으로 64바이트이다. 하지만 최대로 텍스처에 넣어줄 수 있는 바이트는 16바이트이다. 그렇기 때문에 우리가 4개로 쪼개서 가져가도록 해주자.
우리가 버퍼크기를 초기화해줄때 malloc을 사용한다. 이때 잠깐 malloc / free 와 new / delete의 차이를 생각해보자면 생성자 호출이 안된다는 차이가 있다. malloc은 생성자가 필요하지 않지만 new는 생성자가 필요하다. 그리고 포인터 연산을 할때 BYTE 나 Character 형으로의 cast 없이 바꾼다면 바이트 씩 넘어가는 것이 아니라 ~칸 씩 넘어가는 등의 원하는
결과값과 다른 값이 나올 수 있기 때문에 cast를 해주는게 원하는 곳으로 접근하기 위하여 덧셈 뺄셈 연산을 할 좋다.
이러한 연산을 통하여 2차원 배열에서 파편화되어 있을수도있는 데이터를 연속적인 malloc을 통해 결합해준다.
리소스를 만들어줄 때는 지금은 여러가지 텍스처를 통해 넘겨주도록 하기 위해서 서브 텍스처를 여러 개 만들어주자
쉐이더와 연결해주는 부분을 만들어주자. 애니메이션 변경부분은 이전에 사용했던 ImGui를 사용해서 버튼을 통해 변경되게 만들어주자.
ModelAnimator.cpp
void ModelAnimator::Update()
{
    //Anim Update
    ImGui::InputInt("AnimIndex", &_keyframeDesc.animIndex);
    _keyframeDesc.animIndex %= _model->GetAnimationCount();
    ImGui::InputInt("CurrFrame", (int*)&_keyframeDesc.currFrame);
    _keyframeDesc.currFrame %= _model->GetAnimationByIndex(_keyframeDesc.animIndex)->frameCount;

    //애니메이션 현재 프레임 정보
    RENDER->PushKeyframeData(_keyframeDesc);

    //SRV를 전달
    _shader->GetSRV("TransformMap")->SetResource(_srv.Get());
}
이렇게 해주면 아직 쉐이더 코드를 완성하지 않아서 실제로 애니메이션이 바뀌지는 않지만 ImGui창을 통해 값을 변경할 수 있다는 것을 알 수 있다. 이때 오버플로우를 방지하기 위하여 나눗셈 연산을 해주고 있다.
이제 쉐이더 코드쪽에서 내가 원하는 부분을 뽑아서 적용할 수 있도록 함수를 만들어 주자. 여기서 글로벌좌표를 상대좌표로 변환한 뒤에 다시 글로벌 좌표로 변환하는 부분이 들어가게 될 것이다. 입력이 들어올 때는 연관된 뼈 번호와 얼마나 영향을 받는지는 기록되어있는 상태이다. 이 값을 추출하고 이를 통해 행렬을 누적해주면 된다. 이때 16바이트 4개로 나누어 주었기때문에 4칸을 건너뛰어야하고 이를 위해 곱연산을 넣어준다. 이를 4번 반복해서 가중치에 따른 행렬이 누적되기 때문에 이 행렬을 통해 움직이는 연산을 해주면 된다.
이렇게 해주면 current frame을 증가시키면 조금씩이지만 움직이는 모습을 볼 수 있고 AnimIndex를 증가시키면 다른 애니메이션도 실행되는 모습을 볼 수 있다. 지금은 current frame을 증가시키면 뚝뚝 끊기는 느낌이 드는데 이렇게 되는 이유는 우리가 정점의 위치를 강제로 프레임 단위로 강제로 조정해주고 있기 때문이다.
이러한 문제점을 고치기 위해 보간을 사용해주자. 이때 현재 상태와 다음 상태의 재생비율에 따라 섞어 주면 된다. 이 부분을 함수를 수정하여 구현해보자.
처음에는 문제를 이해하지 못했었는데 지그재그로 이해하기보다는 대각선으로 보는게 이해하기 쉽다. 몇번째 대각선에 속해있는 분수인지 구하고 짝수번째 대각선이면 위에서 아래로 가고 홀수번째 대각선이면 아래에서 위로 가기때문에 몇번째 분수인지만 알면 분모와 분자를 구해서 출력해주면 된다.
정답코드
#include "iostream"

using namespace std;

int main()
{
	// d: 현재 대각선 번호 , cnt : 분수의 총 개수
	int x, d = 1, cnt = 0;

	cin >> x;

	//대각선에 속하는 개수까지 증가시켜줌
	while (cnt+d < x)
	{
		cnt += d;
		d++;
	}

	//순서-지금까지의 분수 개수 = 위치
	int idx = x - cnt;
	int answer_x, answer_y;				//분자, 분모

	//짝수이면 아래 홀수이면 위로 감
	if (d % 2 == 0)
	{
		answer_x = idx;
		answer_y = d - idx + 1;

	}
	else
	{
		answer_x = d - idx + 1;
		answer_y = idx;
	}

	cout << answer_x << "/" << answer_y << endl;

	return 0;
}
5킬로그램 봉지를 최대한 쓰고 나머지에 3킬로그램 봉지를 쓰면서 정확하게 N그램에 맞춰야한다. 그게 불가능하다면 -1을 출력해준다.
정답코드
#include "iostream"

using namespace std;

int main() {
    int n;
    cin >> n;

    int cnt = 0;


    while (n >= 0) {
        if (n % 5 == 0) {  // 5로 나누어 떨어지면
            cnt += n / 5;  // 5kg 봉지 개수 더함
            cout << cnt << endl;
            return 0;
        }
        n -= 3;  // 5로 나누어 떨어지지 않으면 3kg 봉지를 하나 사용
        cnt++;  // 3kg 봉지 사용했으므로 봉지 개수 추가
    }

    // 만약 정확히 N kg을 만들 수 없으면 -1 출력
    cout << -1 << endl;
    return 0;
}
#include "pch.h"
#include "ImGuiDemo.h"
#include "GeometryHelper.h"
#include "Camera.h"
#include "GameObject.h"
#include "CameraScript.h"
#include "MeshRenderer.h"
#include "Mesh.h"
#include "Material.h"
#include "Model.h"
#include "ModelRenderer.h"
void ImGuiDemo::Init()
{
//Setup Dear ImGui context
IMGUI_CHECKVERSION();
ImGui::CreateContext();
ImGuiIO& io = ImGui::GetIO(); (void)io;
io.ConfigFlags |= ImGuiConfigFlags_NavEnableKeyboard; // Enable Keyboard Controls
io.ConfigFlags |= ImGuiConfigFlags_NavEnableGamepad; // Enable Gamepad Controls
//Setup Dear ImGui style
ImGui::StyleColorsDark();
//ImGui::StyleColorsLight();
//Setup Platform/Renderer backends
ImGui_ImplWin32_Init(GAME->GetGameDesc().hWnd);
ImGui_ImplDX11_Init(DEVICE.Get(), DC.Get());
}
void ImGuiDemo::Update()
{
// Start the Dear ImGui frame
ImGui_ImplDX11_NewFrame();
ImGui_ImplWin32_NewFrame();
ImGui::NewFrame();
//UI
Test();
}
void ImGuiDemo::Render()
{
// Rendering
ImGui::Render();
/*const float clear_color_with_alpha[4] = { clear_color.x * clear_color.w, clear_color.y * clear_color.w, clear_color.z * clear_color.w, clear_color.w };
g_pd3dDeviceContext->OMSetRenderTargets(1, &g_mainRenderTargetView, NULL);
g_pd3dDeviceContext->ClearRenderTargetView(g_mainRenderTargetView, clear_color_with_alpha);*/
ImGui_ImplDX11_RenderDrawData(ImGui::GetDrawData());
}
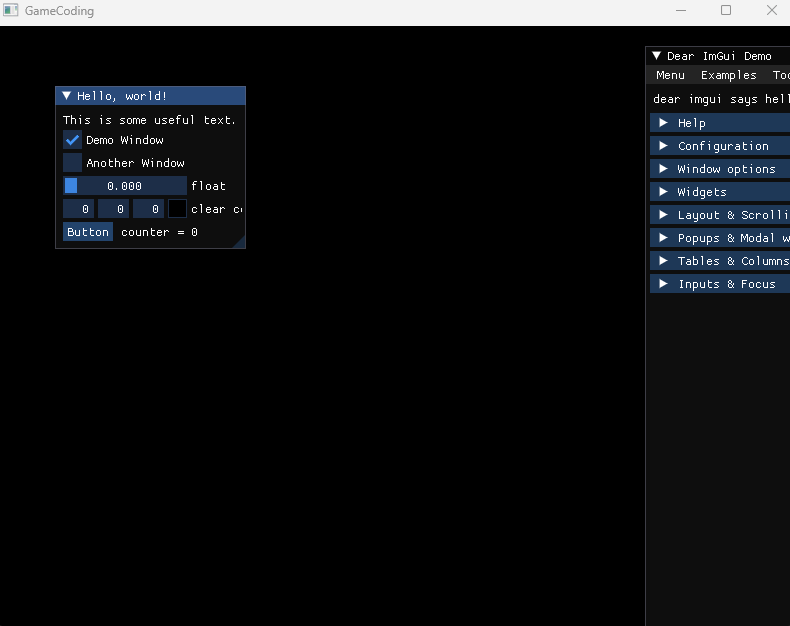
void ImGuiDemo::Test()
{
// 1. Show the big demo window (Most of the sample code is in ImGui::ShowDemoWindow()! You can browse its code to learn more about Dear ImGui!).
if (show_demo_window)
ImGui::ShowDemoWindow(&show_demo_window);
// 2. Show a simple window that we create ourselves. We use a Begin/End pair to create a named window.
{
static float f = 0.0f;
static int counter = 0;
ImGui::Begin("Hello, world!"); // Create a window called "Hello, world!" and append into it.
ImGui::Text("This is some useful text."); // Display some text (you can use a format strings too)
ImGui::Checkbox("Demo Window", &show_demo_window); // Edit bools storing our window open/close state
ImGui::Checkbox("Another Window", &show_another_window);
ImGui::SliderFloat("float", &f, 0.0f, 1.0f); // Edit 1 float using a slider from 0.0f to 1.0f
ImGui::ColorEdit3("clear color", (float*)&clear_color); // Edit 3 floats representing a color
if (ImGui::Button("Button")) // Buttons return true when clicked (most widgets return true when edited/activated)
counter++;
ImGui::SameLine();
ImGui::Text("counter = %d", counter);
//ImGui::Text("Application average %.3f ms/frame (%.1f FPS)", 1000.0f / io.Framerate, io.Framerate);
ImGui::End();
}
// 3. Show another simple window.
if (show_another_window)
{
ImGui::Begin("Another Window", &show_another_window); // Pass a pointer to our bool variable (the window will have a closing button that will clear the bool when clicked)
ImGui::Text("Hello from another window!");
if (ImGui::Button("Close Me"))
show_another_window = false;
ImGui::End();
}
}
이렇게 해주면 일단 뭔가 뜨기는한다. 하지만 눌러도 반응이 없고 잘려서 보인다.
일단 왜 마우스입력이 처리되지 않는지 살펴보기 위해 우리가 입력을 처리했던 제일 메인함수인 Game으로 돌아가보고 ImGUI 샘플코드와 비교해보자. 비교해보면 샘플에서는 입력을 처리하기 위해 윈도우 헨틀를 두고 사용하고 있다는 것을 알 수 있다. 우리도 이 방식을 활용하여 전방선언을 해준 뒤에 Extern 하여 사용해주자
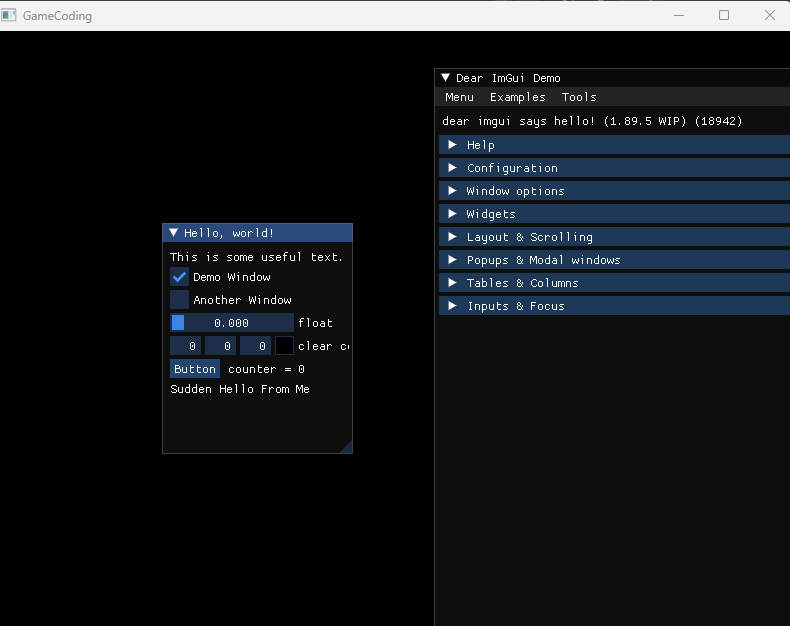
이제 샘플코드의 내용을 분석하고 우리의 방식대로 활용해보자. 우선 Test함수에서 2번부분을 복사한 다음 우리의 방식 대로 사용해보자.
ImGuiDemo.cpp
void ImGuiDemo::Test()
{
// 1. Show the big demo window (Most of the sample code is in ImGui::ShowDemoWindow()! You can browse its code to learn more about Dear ImGui!).
if (show_demo_window)
ImGui::ShowDemoWindow(&show_demo_window);
// 2. Show a simple window that we create ourselves. We use a Begin/End pair to create a named window.
{
static float f = 0.0f;
static int counter = 0;
ImGui::Begin("Hello, world!"); // Create a window called "Hello, world!" and append into it.
ImGui::Text("This is some useful text."); // Display some text (you can use a format strings too)
ImGui::Checkbox("Demo Window", &show_demo_window); // Edit bools storing our window open/close state
ImGui::Checkbox("Another Window", &show_another_window);
ImGui::SliderFloat("float", &f, 0.0f, 1.0f); // Edit 1 float using a slider from 0.0f to 1.0f
ImGui::ColorEdit3("clear color", (float*)&clear_color); // Edit 3 floats representing a color
if (ImGui::Button("Button")) // Buttons return true when clicked (most widgets return true when edited/activated)
counter++;
ImGui::SameLine();
ImGui::Text("counter = %d", counter);
//ImGui::Text("Application average %.3f ms/frame (%.1f FPS)", 1000.0f / io.Framerate, io.Framerate);
ImGui::End();
}
//MY Code
{
static float f = 0.0f;
static int counter = 0;
ImGui::Begin("Hello, world!"); // Create a window called "Hello, world!" and append into it.
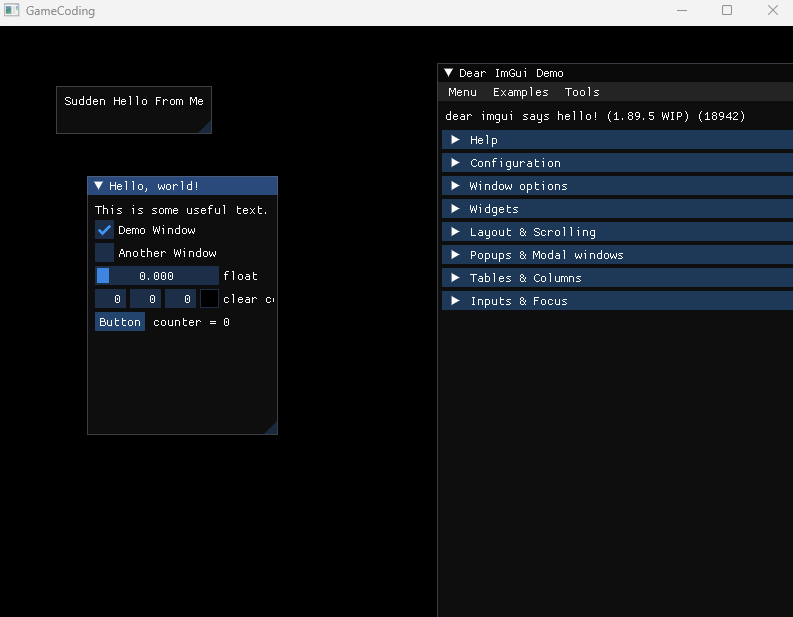
ImGui::Text("Sudden Hello From Me");
//ImGui::Text("Application average %.3f ms/frame (%.1f FPS)", 1000.0f / io.Framerate, io.Framerate);
ImGui::End();
}
// 3. Show another simple window.
if (show_another_window)
{
ImGui::Begin("Another Window", &show_another_window); // Pass a pointer to our bool variable (the window will have a closing button that will clear the bool when clicked)
ImGui::Text("Hello from another window!");
if (ImGui::Button("Close Me"))
show_another_window = false;
ImGui::End();
}
}
이렇게 해주게되면 밑의 결과처럼 Hello World창에서 Text가 제일 밑에 출력되고 있다.
생각을 해보면 Begin의 키값에 따라 지정된 영역에 추가되는 것이라고 볼 수 있다. Begin의 값을 다르게 하면 다른 창이 새로 생기는 것을 볼 수 있다.
이제 우리가 작업할 때 새로운 부분을 추가하는 매니저 클래스를 만들고 이 매니저에 초기화하는 부분과 렌더해주는
부분을 넣어주자
ImGuiManager.h
#pragma once

class ImGuiManager
{
	DECLARE_SINGLE(ImGuiManager);

public:
	void Init();
	void Update();
	void Render();

};
#include "pch.h"
#include "ImGuiDemo.h"
#include "GeometryHelper.h"
#include "Camera.h"
#include "GameObject.h"
#include "CameraScript.h"
#include "MeshRenderer.h"
#include "Mesh.h"
#include "Material.h"
#include "Model.h"
#include "ModelRenderer.h"
void ImGuiDemo::Init()
{
//Setup Dear ImGui context
//IMGUI_CHECKVERSION();
//ImGui::CreateContext();
//ImGuiIO& io = ImGui::GetIO(); (void)io;
//io.ConfigFlags |= ImGuiConfigFlags_NavEnableKeyboard; // Enable Keyboard Controls
//io.ConfigFlags |= ImGuiConfigFlags_NavEnableGamepad; // Enable Gamepad Controls
//Setup Dear ImGui style
//ImGui::StyleColorsDark();
//ImGui::StyleColorsLight();
//Setup Platform/Renderer backends
//ImGui_ImplWin32_Init(GAME->GetGameDesc().hWnd);
//ImGui_ImplDX11_Init(DEVICE.Get(), DC.Get());
}
void ImGuiDemo::Update()
{
// Start the Dear ImGui frame
//ImGui_ImplDX11_NewFrame();
//ImGui_ImplWin32_NewFrame();
//ImGui::NewFrame();
//UI
Test();
}
void ImGuiDemo::Render()
{
// Rendering
//ImGui::Render();
/*const float clear_color_with_alpha[4] = { clear_color.x * clear_color.w, clear_color.y * clear_color.w, clear_color.z * clear_color.w, clear_color.w };
//g_pd3dDeviceContext->OMSetRenderTargets(1, &g_mainRenderTargetView, NULL);
//g_pd3dDeviceContext->ClearRenderTargetView(g_mainRenderTargetView, clear_color_with_alpha);*/
//ImGui_ImplDX11_RenderDrawData(ImGui::GetDrawData());
}
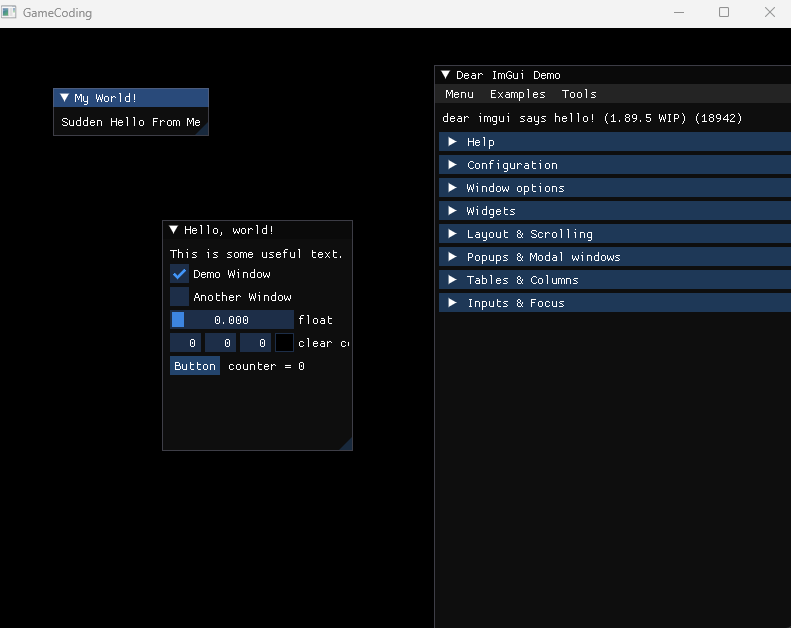
void ImGuiDemo::Test()
{
// 1. Show the big demo window (Most of the sample code is in ImGui::ShowDemoWindow()! You can browse its code to learn more about Dear ImGui!).
if (show_demo_window)
ImGui::ShowDemoWindow(&show_demo_window);
// 2. Show a simple window that we create ourselves. We use a Begin/End pair to create a named window.
{
static float f = 0.0f;
static int counter = 0;
ImGui::Begin("Hello, world!"); // Create a window called "Hello, world!" and append into it.
ImGui::Text("This is some useful text."); // Display some text (you can use a format strings too)
ImGui::Checkbox("Demo Window", &show_demo_window); // Edit bools storing our window open/close state
ImGui::Checkbox("Another Window", &show_another_window);
ImGui::SliderFloat("float", &f, 0.0f, 1.0f); // Edit 1 float using a slider from 0.0f to 1.0f
ImGui::ColorEdit3("clear color", (float*)&clear_color); // Edit 3 floats representing a color
if (ImGui::Button("Button")) // Buttons return true when clicked (most widgets return true when edited/activated)
counter++;
ImGui::SameLine();
ImGui::Text("counter = %d", counter);
//ImGui::Text("Application average %.3f ms/frame (%.1f FPS)", 1000.0f / io.Framerate, io.Framerate);
ImGui::End();
}
//MY Code
{
static float f = 0.0f;
static int counter = 0;
ImGui::Begin("My World!",nullptr,
ImGuiWindowFlags_NoTitleBar |
ImGuiWindowFlags_NoMove);
ImGui::Text("Sudden Hello From Me");
//ImGui::Text("Application average %.3f ms/frame (%.1f FPS)", 1000.0f / io.Framerate, io.Framerate);
ImGui::End();
}
// 3. Show another simple window.
if (show_another_window)
{
ImGui::Begin("Another Window", &show_another_window); // Pass a pointer to our bool variable (the window will have a closing button that will clear the bool when clicked)
ImGui::Text("Hello from another window!");
if (ImGui::Button("Close Me"))
show_another_window = false;
ImGui::End();
}
}
보면 탱크와 비슷하지만 조금 이상하다는 것을 알 수 있다. 이렇게 되는 이유는 우리가 Bone 즉 노드에 대한 정보를 활용하지 않고 그냥 화면에 띄워주기만 했기때문이다. 지금 각 노드의 좌표가 루트로 향하는 좌표로 바꿔져있지만 지금은 그 좌표를 쓰고 있지 않기 때문에 이 개별노드를 배치할 때 처리를 해주어야 한다.
일단 쉐이더쪽에 각 뼈대의 Transform을 받아줄 수 있도록 Matrix를 조장할 수 있는 버퍼를 선언해주고 이 쉐이더로 값을 넣을 수 있게 RenderManager에 구조체와 버퍼를 선언 및 초기화해주고 데이터를 할당해주는 함수를 만들어주자.
처음에 쉐이더에 들어가는 좌표는 우리가 Converter 클래스를 통해 가져온 Vertex 이다. 즉, 각 물체의 정점정보를 전달하고 있는 것이다. 이 좌표는 자기자신을 기준으로 하는 좌표계이다.
처음에 중심에 모여있던 이유는 각 계층별로 루트노드가 기준이 아니라 그냥 자기자신의 좌표를 바탕으로 원점에 배치가 되기 때문에 모든 계층이 겹쳐서 보였던 것이다. 그래서 이것을 바꿔주기 위해 VertexShader 단계에서 루트에서부터 타고오면서 자신의 부모의 좌표를 통해 계산된 자신의 Transform의 좌표를 통해 계산해주었다.
이렇게 해주어야 원래 루트를 기준으로 하는 로컬좌표를 계산해준 것으로 정해준 모양대로 출력될 수 있는 것이다.
이제 모델의 정보를 파싱해오기 위해서 루트노드(-1,-1)에서 부터 계층적으로 정보를 읽어주는 작업해주도록 하자.
지금은 스캘레톤을 저장하는 것 보다는 계층별로 접근하는 노드 하나하나가 Bone 뼈대라고 생각하고 저장해보자 이렇게 트리 구조의 정보를 가져올 떄는 재귀함수를 사용하는 것이 좋다.
fbx에서 transform 정보를 가져오려면 어떤 좌표로 저장되어 있는지 알아야한다. fbx에서는 transform이 Relative 좌표로 저장되어 있기 때문에 부모의 Transform Matrix를 가져와서 곱해주는 것으로 루트로 향하는 상대좌표로 바꾸어 준다.
이때 루트노드부터 재귀적으로 함수가 작동하기 때문에 루트로 향하는 상대좌표로 바꿔줄 수 있는 것이다.
Converter.cpp
//노드- 데이터 저장단위
void Converter::ReadModelData(aiNode* node, int32 index, int32 parent)
{
	shared_ptr<asBone> bone = make_shared<asBone>();
	bone->index = index;
	bone->parent = parent;
	bone->name = node->mName.C_Str();

	//transform 추출 - 주소를 받아주기
	Matrix transform(node->mTransformation[0]);
	//fbx -> 4*4가 전치되어있어서 다시 전치해주어야한다.
	// 상대좌표
	bone->transform = transform.Transpose();


	//루트에 가져온 메트릭스 - 재귀
	Matrix matParent = Matrix::Identity;
	if (parent >= 0)
		matParent = _bones[parent]->transform;
	//Local(Root) Transform
	bone->transform = bone->transform * matParent;

	_bones.push_back(bone);

	//Mesh
	ReadMeshData(node, index);


	//계층타기 - 재귀
	for (uint32 i = 0; i < node->mNumChildren; i++)
		ReadModelData(node->mChildren[i], _bones.size(), index);
}
Mesh도 Bone을 가져올 때 같이 작동하도록 하자. Mesh는 하나의 Mesh에 SubMesh가 여러개 있을 수도 있기 때문에 이 서브 매쉬도 어떻게 관리할지도 생각해보아야한다.
각 노드에 저장된 매쉬데이터는 제일 상위노드인 Scene노드에서 몇번쨰 매쉬에 데이터가 저장되어 있는지 인덱스 정보를 가지고 있다. 그렇기 때문에 인덱스를 가지고 온 다음 Scene에서 mesh를 인덱스 번호를 통해 가져오면 된다. 각 서브Mesh는 정점의 크기를 통해 indices 벡터를 관리해주어서 각 서브 Mesh를 하나의 Vector에서 관리할 수 있도록 하자.
Converter.cpp
void Converter::ReadMeshData(aiNode* node, int32 bone)
{
	if (node->mNumMeshes < 1)
		return;

	shared_ptr<asMesh> mesh = make_shared<asMesh>();
	mesh->name = node->mName.C_Str();
	mesh->boneIndex = bone;

	for (uint32 i = 0; i < node->mNumMeshes; i++)
	{
		//Scene에서 매쉬 번호
		uint32 index = node->mMeshes[i];
		const aiMesh* srcMesh = _scene->mMeshes[index];

		// Material Name - Material 과의 관계를 위해
		const aiMaterial* material = _scene->mMaterials[srcMesh->mMaterialIndex];
		mesh->materialName = material->GetName().C_Str();

		//시작 정점번호 - 서브매쉬 구분을 위하여
		const uint32 startVertex = mesh->vertices.size();

		for (uint32 v = 0; v < srcMesh->mNumVertices; v++)
		{
			// Vertex
			VetexType vertex;
			::memcpy(&vertex.position, &srcMesh->mVertices[v], sizeof(Vec3));

			// UV
			if (srcMesh->HasTextureCoords(0))
				::memcpy(&vertex.uv, &srcMesh->mTextureCoords[0][v], sizeof(Vec2));

			// Normal
			if (srcMesh->HasNormals())
				::memcpy(&vertex.normal, &srcMesh->mNormals[v], sizeof(Vec3));

			mesh->vertices.push_back(vertex);
		}

		// Index
		for (uint32 f = 0; f < srcMesh->mNumFaces; f++)
		{
			aiFace& face = srcMesh->mFaces[f];

			for (uint32 k = 0; k < face.mNumIndices; k++)
				mesh->indices.push_back(face.mIndices[k] + startVertex);
		}
	}

	_meshes.push_back(mesh);
}
3. 모델 띄우기
이제 최종적으로 저장된 파일을 메모리로 가져와서 띄워보자. 일단 파일을 읽어오고 그 파일을 쓰고 읽어오는 코드를 담은 FileUtils클래스를 만들어주자.