https://www.youtube.com/watch?v=XhfB3ZS3JoM&list=LL&index=5&t=11139s
이번에 유투브 강의영상을 보고 따라 만들어 보기로 하였다. 여기서 똑같이 만드는 것이 아닌 내 방식대로 만들어보려고 한다.
그리고 여기에 내가 응원하는 배우님이 카페에 올려주신 사진을 활용해서 카드 짝 맞추기 게임을 만들어 볼 것이다.
구현 순서는 영상에 나오는 순서대로 구현을 해보도록 할 것이다.
1.카드 및 보드 구현
우선 카드 객체를 구현해보자 필요한 기능은 뒤집는 기능이 필요하다. 이 기능은 Dotween과 IPointerClickHandler를 사용하여 구현하였다.
Card.cs
using UnityEngine;
using UnityEngine.EventSystems;
using DG.Tweening;

public class Card : MonoBehaviour, IPointerClickHandler
{
    [SerializeField] private SpriteRenderer spriteRenderer;
    [SerializeField] private Sprite frontSprite;
    [SerializeField] private Sprite backSprite;
    private Board board;
    private bool isFlipped = false;
    private bool isAnimating = false;

    private void Awake()
    {
        spriteRenderer = GetComponent<SpriteRenderer>();

    }

    public void SetCard(Sprite sprite, Board board)
    {
        frontSprite = sprite;
        this.board = board;
        backSprite = Resources.Load<Sprite>("Sprites/Front/Front"); // 뒷면 기본 이미지
        spriteRenderer.sprite = backSprite;
    }

    public void OnPointerClick(PointerEventData eventData)
    {
        if (board.GetSelectedCardCount() >= 2 || isFlipped || isAnimating)
            return; // 이미 2장이 선택되었으면 클릭 방지

        FlipCard();
        board.SelectCard(this);
    }


    public void FlipCard()
    {
        if (isAnimating) return;
        isAnimating = true;

        Vector3 targetScale = new Vector3(0f, transform.localScale.y, transform.localScale.z);


        transform.DOScale(targetScale, 0.2f).OnComplete(() =>
        {
            spriteRenderer.sprite = isFlipped ? backSprite : frontSprite;
            isFlipped = !isFlipped;

            transform.DOScale(Vector3.one, 0.2f).OnComplete(() =>
            {
                isAnimating = false;
            });
        });


    }

    public void FlipBack()
    {
        if (!isFlipped) return;
        FlipCard();
    }

    public Sprite GetSprite()
    {
        return frontSprite;
    }

    public bool IsFlipped()
    {
        return isFlipped;
    }

}
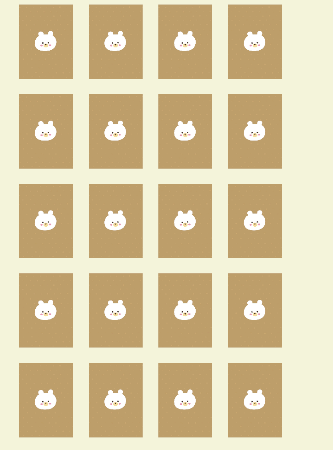
보드는 모든 카드의 위치를 관리해주고 룰을 결정해준다. 카드는 4*5배열로 배치되게 하였다.
Board.cs
using UnityEngine;
using System.Collections.Generic;
using System.Linq;

public class Board : MonoBehaviour
{
    [SerializeField] private GameObject cardPrefab;
    [SerializeField] private Sprite[] cardSprites; // 카드 앞면 (1~6번 이미지)
    private List<Card> cards = new List<Card>();
    private List<Card> selectedCards = new List<Card>(); // 선택된 카드들

    private int rowCount = 5;           //세로
    private int colCount = 4;           //가로
    private float xStart = -2.1f;
    private float yStart = 3.3f;
    private float xSpacing = 1.4f;
    private float ySpacing = -1.8f;

    private void Awake()
    {
        cardPrefab = Resources.Load<GameObject>("Prefabs/Card/Card");
        LoadSprites();
        ShuffleCards();
        InitBoard();
    }

    void LoadSprites()
    {
        // Resources 폴더에서 "Sprites/0~9" 로드
        cardSprites = new Sprite[10];
        for (int i = 0; i < 10; i++)
        {
            cardSprites[i] = Resources.Load<Sprite>($"Sprites/Back/{i}");
        }
    }

    public void ShuffleCards()
    {
        List<Sprite> tempSprites = new List<Sprite>();

        // 0~9번 카드 각각 2장씩 추가
        foreach (var sprite in cardSprites)
        {
            tempSprites.Add(sprite);
            tempSprites.Add(sprite);
        }

        // 랜덤 섞기
        tempSprites = tempSprites.OrderBy(x => Random.value).ToList();

        // cards 리스트에 카드 추가
        cards.Clear();
        for (int i = 0; i < tempSprites.Count; i++)
        {
            GameObject newCard = Instantiate(cardPrefab, Vector3.zero, Quaternion.identity, this.transform);
            Card card = newCard.GetComponent<Card>();
            card.SetCard(tempSprites[i], this);
            cards.Add(card);
        }
    }


    public void InitBoard()
    {
        int index = 0;
        for (int i = 0; i < rowCount; i++)
        {
            for (int j = 0; j < colCount; j++)
            {
                if (index >= cards.Count) return;  // 카드 개수 초과 방지

                // 위치 설정
                Vector3 pos = new Vector3(xStart + (xSpacing * j), yStart + (ySpacing * i), 0);

                // 기존에 생성된 카드 객체를 위치만 변경
                cards[index++].transform.position = pos;

            }
        }
    }


    public void SelectCard(Card card)
    {
        if (selectedCards.Contains(card) || selectedCards.Count >= 2)
            return;

        selectedCards.Add(card);

        if (selectedCards.Count == 2)
        {
            CheckMatch();
        }
    }

    void CheckMatch()
    {
        if (selectedCards.Count < 2) return; // 두 장 선택되지 않으면 비교 불가

        if (selectedCards[0].GetSprite() == selectedCards[1].GetSprite())
        {
            // 같은 카드라면 유지
            selectedCards.Clear();
            Managers.Audio.PlaySound("Match");  // 카드 맞추면 효과음 재생!
        }
        else
        {
            // 다른 카드라면 1초 후 다시 뒤집기
            Invoke(nameof(ResetCards), 1f);
        }
    }

    void ResetCards()
    {
        foreach (var card in selectedCards)
        {
            card.FlipBack();
        }
        selectedCards.Clear();
    }


    public int GetSelectedCardCount() => selectedCards.Count;
    public List<Card> GetCards() => cards;
}
실제로 배치된 모습을 보면 다음과 같다
이제 GameManager를 통해 이 보드의 초기화 함수인 Init을 호출해주고 코루틴 함수를 통해 모든 카드를 오픈하고 다시 뒤집어서 유저가 게임을 진행할 수 있게 한다. 또한 시간을 관리해주고 게임이 이겼는지 확인해준다.
GamaManager.cs
using System;
using System.Collections;
using System.Collections.Generic;
using TMPro;
using UnityEngine;
using UnityEngine.PlayerLoop;
using UnityEngine.UI;
using static UnityEngine.RuleTile.TilingRuleOutput;

public class GameManager
{
    private Board board;
    private List<Card> cards;
    private bool isGameActive = false;
    private float gameTime = 60f; // 총 게임 시간
    private float remainingTime; // 현재 남은 시간

    private Slider timeSlider;
    private Image sliderFill; // 슬라이더의 Fill 색상 변경용
    private TextMeshProUGUI timeText; // 남은 시간을 표시하는 UI
    public event Action<float> OnTimeUpdated;

    public void Init()
    {
        board = GameObject.Find("Board")?.GetComponent<Board>();
        timeSlider = GameObject.Find("TimeOutSlider")?.GetComponent<Slider>();
        timeText = GameObject.Find("TimeOutText")?.GetComponent<TextMeshProUGUI>();

        if (board == null || timeSlider == null || timeText == null)
        {
            Debug.LogError("GameManager 초기화 실패 - 필수 UI 요소가 없음.");
            return;
        }

        // 게임 시작
        isGameActive = true;

        sliderFill = timeSlider.fillRect.GetComponent<Image>();
        remainingTime = gameTime;

        CoroutineHelper.StartCoroutine(StartGameSequence());
    }


    IEnumerator StartGameSequence()
    {
        // 보드가 초기화될 시간을 기다림
        yield return new WaitForSeconds(0.3f);
        cards = board.GetCards();

        // 모든 카드 공개 (처음 1초 동안)
        foreach (var card in cards)
        {
            card.FlipCard();
        }
        yield return new WaitForSeconds(1.5f);

        // 다시 뒤집기
        foreach (var card in cards)
        {
            card.FlipBack();
        }

        yield return new WaitForSeconds(0.3f);

        // 타이머 UI 활성화
        timeSlider.gameObject.SetActive(true);
        timeText.gameObject.SetActive(true);
        Managers.Audio.PlayBGM("BGM");


        CoroutineHelper.StartCoroutine(UpdateTimer());
    }

    IEnumerator UpdateTimer()
    {
        while (remainingTime > 0 && isGameActive)
        {
            remainingTime -= Time.deltaTime;
            timeSlider.value = remainingTime;
            OnTimeUpdated?.Invoke(remainingTime); // UI 업데이트 호출

            if (CheckWinCondition())
            {
                GameOver(true);
                yield return new WaitForSeconds(1f);
                yield break;
            }

            yield return null;
        }

        if (remainingTime <= 0)
        {
            GameOver(false);
        }
    }

    private bool CheckWinCondition()
    {
        foreach (var card in board.GetCards())
        {
            if (!card.IsFlipped()) return false;
        }
        return true;
    }

    private void GameOver(bool isWin)
    {
        isGameActive = false;
        Time.timeScale = 0.0f;
        CoroutineHelper.StartCoroutine(GameOverSequence(isWin));
    }

    private IEnumerator GameOverSequence(bool isWin)
    {
        yield return new WaitForSecondsRealtime(0.5f); // 0.5초 딜레이 후 실행

        // DOTween의 모든 트위닝을 제거
        DG.Tweening.DOTween.KillAll();

        if (isWin)
        {
            Managers.UI.ShowPopupUI<UI_Success>();
        }
        else
        {
            Managers.UI.ShowPopupUI<UI_GameOver>();
        }
    }

}
그리고 게임에 필요한 UI는 UI_Game으로 묶어서 관리해주도록 했다. 옵저버 패턴을 사용하여 시간이 지남에 따라 색깔이 바뀌고 슬라이더의 바가 줄어들도록 구현했다. 이때 각 오브젝트의 이름과 Bind하는 enum 변수들의 이름이 같아야 정상적으로 Bind가 이루어진다.
UI_Game.cs
using System.Collections;
using System.Collections.Generic;
using TMPro;
using UnityEngine;
using UnityEngine.EventSystems;
using UnityEngine.UI;

public class UI_Game : UI_Scene
{

    enum Buttons
    {
        EscapeButton,
    }

    enum Texts
    {
        TimeOutText,
    }

    enum GameObjects
    {
        TimeOutSlider,
    }

    private float gameTime = 60f; // 총 게임 시간


    public override void Init()
    {
        base.Init(); // 상위 클래스의 초기화 메서드 호출

        Bind<Button>(typeof(Buttons));
        Bind<TextMeshProUGUI>(typeof(Texts));
        Bind<GameObject>(typeof(GameObjects));

        GetObject((int)GameObjects.TimeOutSlider).GetComponent<Slider>().maxValue = gameTime;
        GetObject((int)GameObjects.TimeOutSlider).GetComponent<Slider>().value = gameTime;
        GetButton((int)Buttons.EscapeButton).gameObject.AddUIEvent(PauseOrResume);

        Managers.Game.OnTimeUpdated += UpdateTimeUI;
    }

    void PauseOrResume(PointerEventData eventData)
    {
        // 1. 뭐든지 열려있으면 다 닫기
        // 2. 아무것도 없으면 열기

        if (Managers.UI.GetStackSize() > 0)
            Managers.UI.CloseAllPopupUI();
        else
            Managers.UI.ShowPopupUI<UI_PausePopup>();
    }

    private void UpdateTimeUI(float time)
    {
        GetText((int)Texts.TimeOutText).text = Mathf.CeilToInt(time).ToString();
        GetObject((int)GameObjects.TimeOutSlider).GetComponent<Slider>().value = time;
        UpdateTimeColor(time);
    }


    private void UpdateTimeColor(float time)
    {
        float normalizedTime = time / gameTime;
        Color startColor = new Color(0.96f, 0.55f, 0.0f);
        Color endColor = new Color(1.0f, 0.0f, 0.0f);
        Color timeColor = Color.Lerp(endColor, startColor, normalizedTime);

        GetText((int)Texts.TimeOutText).color = timeColor;
        GetObject((int)GameObjects.TimeOutSlider).GetComponent<Slider>().fillRect.GetComponent<Image>().color = timeColor;
    }

    private void OnDisable()
    {
        Managers.Game.OnTimeUpdated -= UpdateTimeUI;
    }
}
UI구성은 다음과 같다.

'게임공부 > Unity' 카테고리의 다른 글
| [Unity][C#][비행기 슈팅 게임]1. 움직이기(new Input system) (0) | 2025.03.13 |
|---|---|
| [C#][Unity][나만의 탑뷰 게임 만들기]9. 적 시스템구현1(FSM) (0) | 2025.01.30 |
| [C#][Unity][나만의 탑뷰 게임 만들기]8. 인벤토리 시스템 수정 (1) | 2025.01.13 |
| [C#][디자인 패턴]State 패턴 (0) | 2025.01.09 |
| [Unity]최적화 관련 팁 (0) | 2025.01.08 |