https://www.acmicpc.net/problem/1629


제한시간이 짧기 때문에 거듭제곱을 분할정복을 통해 풀어야한다. 이때 빠른 거듭제곱을 사용할 수 있다. 

빠른 거듭제곱은 지수가 짝수일때와 홀수일때를 나눠서 분할하여 계산해주는 방법이다.

이러한 방식을 재귀적으로 적용하면, 지수를 절반으로 줄여가며 ABmod  CA^B \mod C를 계산할 수 있다. 이를 통해 시간 복잡도를 O(log⁡B)O(\log B)로 줄일 수 있다.


정답코드

#include <iostream>
using namespace std;

// 분할 정복을 이용한 거듭제곱 함수
long long modExp(long long a, long long b, long long c) {
    if (b == 0) return 1;           // A^0 = 1
    if (b == 1) return a % c;        // A^1 = A % C

    long long half = modExp(a, b / 2, c); // A^(B/2) 계산

    if (b % 2 == 0) {
        // B가 짝수인 경우
        return (half * half) % c;
    }
    else {
        // B가 홀수인 경우
        return ((half * half) % c * a % c) % c;
    }
}

int main() {
    long long a, b, c;
    cin >> a >> b >> c;

    cout << modExp(a, b, c) << endl;

    return 0;
}


https://www.acmicpc.net/problem/2740


2차원 벡터로 각 행렬을 입력받은 다음 행렬 곱셉의 공식대로 3중 for을 통해 곱셉을 해주면 된다.


정답코드

#include <iostream>
#include <vector>

using namespace std;

vector<vector<int>> a;
vector<vector<int>> b;
vector < vector<int>> result;

int main()
{
	int n, m, k;
	cin >> n >> m;
	a.resize(n, vector<int>(m));

	for (int i = 0; i < n; i++)
	{
		for (int j = 0; j < m; j++)
		{
			cin >> a[i][j];
		}
	}

	cin >> m >> k;
	b.resize(m, vector<int>(k));

	for (int i = 0; i < m; i++)
	{
		for (int j = 0; j < k; j++)
		{
			cin >> b[i][j];
		}
	}


	//행렬곱셈
	result.resize(n, vector<int>(k, 0));
	
	for (int i = 0; i < n; i++) {
		for (int j = 0; j < k; j++) {
			for (int p = 0; p < m; p++) {
				result[i][j] += a[i][p] * b[p][j];
			}
		}
	}

	for (int i = 0; i < n; i++) {
		for (int j = 0; j < k; j++) {
			cout << result[i][j] << " ";
		}
		cout << "\n";
	}

	return 0;

}

https://www.acmicpc.net/problem/1780


분할정복으로 풀면되는 문제이다. 

우선 그래프를 입력받고 그래프의 0,0부터 시작해서 같은 숫자라면 그 숫자의 카운트를 증가시켜주고 아니라면 크기를

3등분하여 재귀 함수로 이 과정을 반복하게 만들어주면서 -1 0 1의 카운트를 증가시켜준다. 이 과정을 한칸로 순회할 떄 까지나 같은 숫자로만 구성되어 있을 때까지 반복해준다.


정답코드

#include <iostream>
#include <vector>

using namespace std;

vector<vector<int>> graph;
int minuscnt = 0;
int zerocnt = 0;
int onecnt = 0;

bool isSameNum(int x, int y, int size) {
	int num = graph[x][y]; // 첫 번째 칸의 수
	for (int i = x; i < x + size; i++) {
		for (int j = y; j < y + size; j++) {
			if (graph[i][j] != num) {
				return false; // 다른 수가 섞여 있으면 false 반환
			}
		}
	}
	return true; // 모두 같다면 true
}

// 분할 정복 함수
void divideAndConquer(int x, int y, int size) {
	if (isSameNum(x, y, size)) {
		if (graph[x][y] == -1) {
			minuscnt++;
		}
		else if(graph[x][y] == 0){
			zerocnt++;
		}
		else
		{
			onecnt++;
		}
	}
	else {

		int newSize = size / 3;
		divideAndConquer(x, y, newSize); // 왼쪽 위
		divideAndConquer(x, y + newSize, newSize); // 가운데 위
		divideAndConquer(x, y + 2 * newSize, newSize); //오른쪽 위

		divideAndConquer(x + newSize, y, newSize); // 왼쪽 가운데
		divideAndConquer(x + newSize, y + newSize, newSize); // 가운데 가운데
		divideAndConquer(x + newSize, y + 2 * newSize, newSize); //오른쪽 가운데

		divideAndConquer(x + 2 * newSize, y, newSize); // 왼쪽 아래
		divideAndConquer(x + 2 * newSize, y + newSize, newSize); // 가운데 아래
		divideAndConquer(x + 2 * newSize, y + 2 * newSize, newSize); //오른쪽 아래
	}
}

int main()
{
	int n;
	cin >> n;
	graph.resize(n, vector<int>(n));

	for (int i = 0; i < n; i++)
	{
		for (int j = 0; j < n; j++)
		{
			cin >> graph[i][j];
		}
	}
	
	divideAndConquer(0, 0, n);

	cout << minuscnt << "\n" << zerocnt << "\n" << onecnt << "\n";

	return 0;
}

'코딩테스트 > 백준' 카테고리의 다른 글

[백준][C++]1629번. 곱셈  (0) 2024.11.14
[백준][C++]2740번. 행렬 곱셈  (0) 2024.11.13
[백준][C++]1992번. 쿼드트리  (0) 2024.11.11
[백준][C++]2630번. 색종이 만들기  (0) 2024.11.10
[백준][C++]1786번. 찾기  (0) 2024.11.09

https://www.acmicpc.net/problem/1992


분할정복 알고리즘을 통해 풀 수 있는 문제이다. 

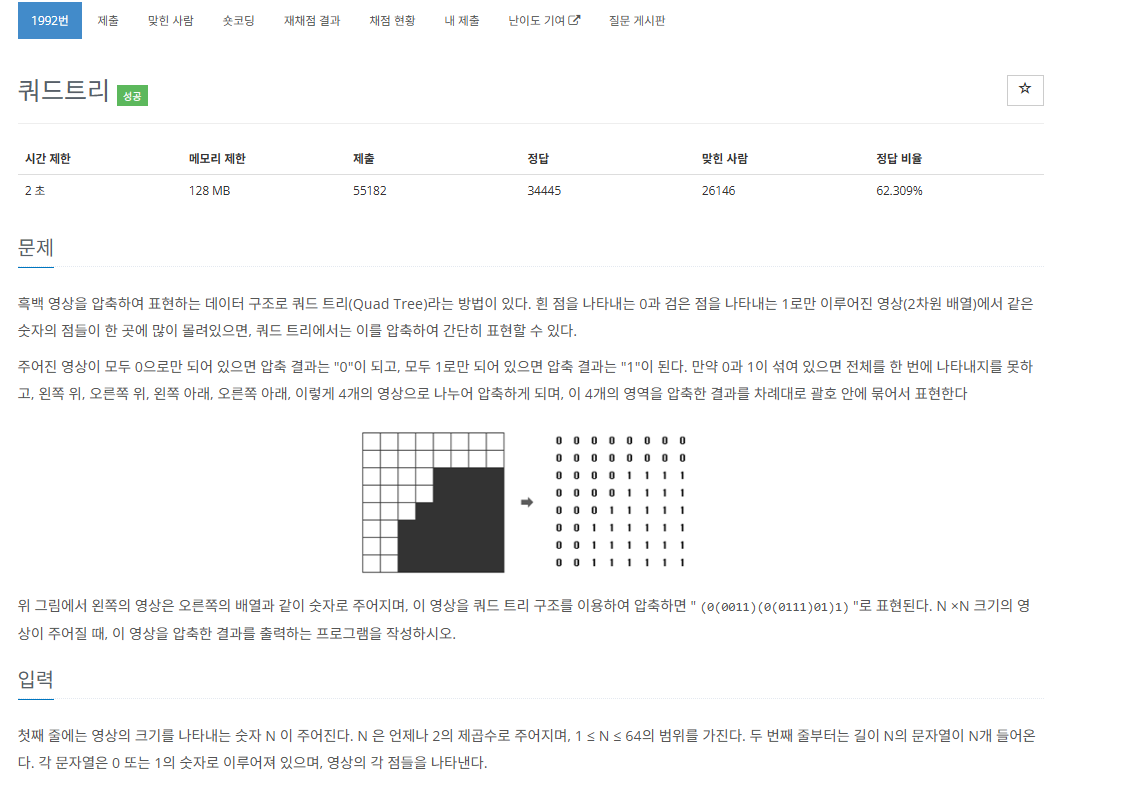
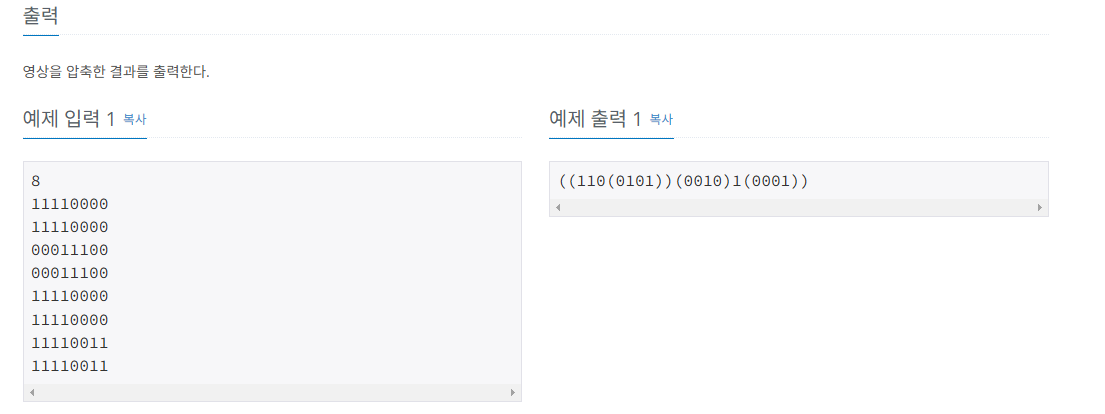
우선 그래프 입력을 받고 함수를 통해 같은 수로만 구성되어있다면 그 수를 출력해주고 아니라면 4등분해서 같은 수가 나올 때까지 나 한칸만 남을때까지 반복해준다.


정답코드

#include <iostream>
#include <vector>

using namespace std;

vector<vector<int>> graph;

bool isSameNum(int x, int y, int size) {
	int num = graph[x][y]; // 첫 번째 칸의 수
	for (int i = x; i < x + size; i++) {
		for (int j = y; j < y + size; j++) {
			if (graph[i][j] != num) {
				return false; // 다른 수가 섞여 있으면 false 반환
			}
		}
	}
	return true; // 모두 같다면 true
}

// 분할 정복 함수
void divideAndConquer(int x, int y, int size) {
	if (isSameNum(x, y, size)) {
		cout << graph[x][y];
	}
	else {

		cout << "(";
		
		int newSize = size / 2;
		divideAndConquer(x, y, newSize); // 왼쪽 위
		divideAndConquer(x, y + newSize, newSize); // 오른쪽 위
		divideAndConquer(x + newSize, y, newSize); // 왼쪽 아래
		divideAndConquer(x + newSize, y + newSize, newSize); // 오른쪽 아래
		cout << ")";
	}
}


int main()
{
	int n;
	cin >> n;
	graph.resize(n, vector<int>(n));

	for(int i=0;i<n;i++)
	{
		for (int j = 0; j < n; j++)
		{
			char ch;
			cin >> ch;
			graph[i][j] = ch - '0';
		}
	}

	divideAndConquer(0, 0, n);

	return 0;

}

https://www.acmicpc.net/problem/2630


전체 색깔정보를 그래프에 저장하고 이를 함수를 통해 순회하면서 만약 같은 전체 종이가 모두 같은 색이라면 그 종이의 색을 카운트에 추가해주고 아니라면 4등분으로 나누어서 다시 순회하는 과정을 잘라진 종이가 모두 하얀색 또는 모두 파란색으로 칠해져 있거나, 하나의 정사각형 칸이 되어 더 이상 자를 수 없을 때까지 반복한다.


정답코드

#include <iostream>
#include <vector>

using namespace std;

vector<vector<int>> graph;
int whitecnt = 0;
int bluecnt = 0;

bool isSameColor(int x, int y, int size) {
	int color = graph[x][y]; // 첫 번째 칸의 색
	for (int i = x; i < x + size; i++) {
		for (int j = y; j < y + size; j++) {
			if (graph[i][j] != color) {
				return false; // 다른 색이 섞여 있으면 false 반환
			}
		}
	}
	return true; // 모두 같은 색이면 true 반환
}

// 분할 정복 함수
void divideAndConquer(int x, int y, int size) {
	if (isSameColor(x, y, size)) {
		// 모두 같은 색이면 해당 색에 따라 개수 증가
		if (graph[x][y] == 0) {
			whitecnt++;
		}
		else {
			bluecnt++;
		}
	}
	else {
		// 다른 색이 섞여 있으면 4등분하여 재귀적으로 호출
		int newSize = size / 2;
		divideAndConquer(x, y, newSize); // 왼쪽 위
		divideAndConquer(x, y + newSize, newSize); // 오른쪽 위
		divideAndConquer(x + newSize, y, newSize); // 왼쪽 아래
		divideAndConquer(x + newSize, y + newSize, newSize); // 오른쪽 아래
	}
}

int main()
{
	int n;
	cin >> n;

	graph.resize(n, vector<int>(n));

	for (int i = 0; i < n; i++)
	{
		for (int j = 0; j < n; j++)
		{
			cin >> graph[i][j];
		}
	}

	divideAndConquer(0, 0, n);
	
	cout << whitecnt << "\n";
	cout << bluecnt << "\n";

	return 0;
}


https://www.acmicpc.net/problem/1786


문제가 굉장히 긴데 요약하자면

주어진 문자열 T 에서 P가 몇번 나타나고 그 위치가 어디인지를 출력해주면 된다. 

이때 문제에서 주어진 KMP알고리즘을 사용해서 문제를 해결할 수 있다.

KMP알고리즘은 해당 문자열의 접두사와 접미사의 일치정보를 구해주는 LPS 함수를 만들고 이를 통해 KMP를 실행해주면 된다.


LPS의 작동예제는 다음과 같다.

예제: P = "ABCDABD"

패턴 P가 "ABCDABD"일 때, 각 부분 문자열에서 접두사와 접미사가 일치하는 최대 길이를 계산해 보자

  1. P[0] = "A": 부분 문자열이 "A"이므로, 접두사와 접미사가 일치하는 부분이 없다
    → lps[0] = 0
  2. P[0..1] = "AB": 부분 문자열이 "AB"이므로, 접두사와 접미사가 일치하는 부분이 없다.
    → lps[1] = 0
  3. P[0..2] = "ABC": 부분 문자열이 "ABC"이므로, 접두사와 접미사가 일치하는 부분이 없다.
    → lps[2] = 0
  4. P[0..3] = "ABCD": 부분 문자열이 "ABCD"이므로, 접두사와 접미사가 일치하는 부분이 없다.
    → lps[3] = 0
  5. P[0..4] = "ABCDA": 부분 문자열이 "ABCDA"에서 접두사와 접미사가 일치하는 최대 부분은 "A"이다.
    → lps[4] = 1
  6. P[0..5] = "ABCDAB": 부분 문자열이 "ABCDAB"에서 접두사와 접미사가 일치하는 최대 부분은 "AB"이다.
    → lps[5] = 2
  7. P[0..6] = "ABCDABD": 부분 문자열이 "ABCDABD"에는 일치하는 접두사와 접미사가 없다.
    → lps[6] = 0

따라서, LPS 배열은 다음과 같다.

lps = [0, 0, 0, 0, 1, 2, 0]


그 다음 KMP단계는 다음과 같이 이루어진다.


LPS 배열이 준비되면, 이제 문자열T에서 패턴 P를 검색한다.

  • i는 텍스트 T의 인덱스, j는 패턴 P의 인덱스를 나타낸다.
  • T[i]와 P[j]가 일치하는 경우, i와 j를 각각 1씩 증가시킨다.
  • j가 패턴의 길이 m에 도달하면, 패턴 P가 T에서 발견된 것이므로 i - j 위치를 결과로 저장하고, j를 lps[j-1]로 이동시켜 다음 검색을 이어간다.
  • T[i]와 P[j]가 일치하지 않으면, j가 0이 아닌 경우 j = lps[j-1]로 이동하여 일치했던 부분을 재활용하며 검색을 이어가고, j가 0이면 i를 증가시킨다.

정답코드

#include <iostream>
#include <vector>
#include <string>

using namespace std;

// LPS (Longest Prefix Suffix) 배열 생성 함수
vector<int> computeLPSArray(const string& P) {
    int m = P.size();
    vector<int> lps(m, 0);
    int len = 0; // 길이가 일치하는 접두사와 접미사의 길이
    int i = 1;

    while (i < m) {
        if (P[i] == P[len]) {
            len++;
            lps[i] = len;
            i++;
        }
        else {
            if (len != 0) {
                len = lps[len - 1];
            }
            else {
                lps[i] = 0;
                i++;
            }
        }
    }
    return lps;
}

// KMP 알고리즘을 이용한 패턴 검색
vector<int> KMPSearch(const string& T, const string& P) {
    int n = T.size();
    int m = P.size();
    vector<int> lps = computeLPSArray(P);
    vector<int> result;
    int i = 0; // 텍스트 T의 인덱스
    int j = 0; // 패턴 P의 인덱스

    while (i < n) {
        if (P[j] == T[i]) {
            i++;
            j++;
        }
        if (j == m) {
            result.push_back(i - j + 1); // 매칭 위치 저장 (1-based index)
            j = lps[j - 1];
        }
        else if (i < n && P[j] != T[i]) {
            if (j != 0) {
                j = lps[j - 1];
            }
            else {
                i++;
            }
        }
    }
    return result;
}

int main() {
    string T, P;
    getline(cin, T);
    getline(cin, P);

    vector<int> matches = KMPSearch(T, P);

    // 매칭 개수 출력
    cout << matches.size() << endl;

    // 매칭 위치 출력
    for (int pos : matches) {
        cout << pos << " ";
    }
    cout << endl;

    return 0;
}

https://www.acmicpc.net/problem/2579


계단 오르기 게임에서 얻을 수 있는 최대 점수를 구해야한다. 나는 이 문제를 DP로 풀어보았다. 우선 3개의 계단까지의 초기값을 설정해주고 점화식을 통해 n-1까지 dp배열을 추가해준다.

이때 규칙은 문제에서 주어진 것을 바탕으로 


  • 계단은 한 번에 한 계단 또는 두 계단씩만 오를 수 있습니다.
  • 연속된 세 개의 계단을 모두 밟을 수 없습니다.
  • 마지막 계단은 반드시 밟아야 합니다.

이렇게 2개로 나눠볼 수 있다.


  • dp[i-2] + v[i]: 두 계단 전에서 오는 경우
  • dp[i-3] + v[i-1] + v[i]: 세 계단 전에서 현재 계단을 포함하여 두 개의 연속된 계단을 밟는 경우

정답코드

#include <iostream>
#include <vector>
#include <algorithm>
using namespace std;

int main() {
    int n;
    cin >> n;
    vector<int> v(n);
    vector<int> dp(n);

    for (int i = 0; i < n; i++) {
        cin >> v[i];
    }

    if (n == 1) {
        cout << v[0] << endl;
        return 0;
    }
    else if (n == 2) {
        cout << v[0] + v[1] << endl;
        return 0;
    }

    // 초기값 설정
    dp[0] = v[0];
    dp[1] = v[0] + v[1];
    dp[2] = max(v[0] + v[2], v[1] + v[2]);

    // 점화식을 이용하여 dp 배열 채우기
    for (int i = 3; i < n; i++) {
        dp[i] = max(dp[i - 2] + v[i], dp[i - 3] + v[i - 1] + v[i]);
    }

    cout << dp[n - 1] << endl;
    return 0;
}


https://www.acmicpc.net/problem/11053


가장 긴 증가하는 부분 수열 LIS를 해결하는 방법 중에 DP를 사용해서 풀어보겠다. 

주어진 배열의 각 위치에 대해, 그 위치까지의 LIS 길이를 저장하는 벡터를 만들고 처음에는 각 원소가 자기 자신만 포함하더라도 수열의 길이는 1이므로, dp 배열의 모든 값을 1로 초기화한다. 

dp[i]는 i번째 원소를 마지막으로 하는 가장 긴 증가 부분 수열의 길이이고 이를 구해야한다. 

예제 입력을 바탕으로 설명해보자면 


  • i=1 (값: 10)
    • 10보다 앞에 있는 수가 없으므로, dp[1] = 1.
    • 현재 dp 상태: [1, 1, 1, 1, 1, 1]
  • i=2 (값: 20)
    • 앞에 있는 수 10은 20보다 작으므로, dp[2] = dp[1] + 1 = 2.
    • 현재 dp 상태: [1, 2, 1, 1, 1, 1]
  • i=3 (값: 10)
    • 앞에 있는 수 중 10보다 작은 수는 없으므로, dp[3] = 1.
    • 현재 dp 상태: [1, 2, 1, 1, 1, 1]

이런식으로 검사를 하면서 DP의 값을 업데이트해주고 가장 긴 값을 저장해서 출력해주면 된다.


정답코드

#include <iostream>
#include <vector>

using namespace std;

int main()
{
	int n;

	cin >> n;

	vector<int> v(n);
	vector<int> dp(n,1);

	for (int i = 0; i < n; i++)
	{
		cin >> v[i];
	}

	int answer = 1;

	
	for (int i = 1; i < n; i++)
	{
		for (int j = 0; j < i; j++)
		{
			//기준값보다 작은게 몇개인지 센다.
			if (v[i] > v[j])
			{
				dp[i] = max(dp[i], dp[j] + 1);
			}
		}
		answer = max(answer, dp[i]);
	}

	cout << answer << "\n";

	return 0;
}


'코딩테스트 > 백준' 카테고리의 다른 글

[백준][C++]1786번. 찾기  (0) 2024.11.09
[백준][C++]2579번. 계단 오르기  (2) 2024.11.08
[백준][C++]1463번. 1로 만들기  (1) 2024.10.26
[백준][C++]1932번. 정수 삼각형  (1) 2024.10.25
[백준][C++]1149번. RGB거리  (1) 2024.10.25


이번에는 npc와의 상호작용과 이를 통해 npc와 대화를 할 수 있도록 만들어보자. 상호작용은 저번에 추가해준 InputAction을 통해 작동하도록 하자.

우선 대화 text는 Ink 라이브러리를 통해 만들어줄 것이다. Ink는 Asset Store를 통해 Import해주고  Inky라는 에디터를 통해 대화를 만들어주면 된다. 

Inky는 다음 링크를 통해 다운받을 수 있다.

https://www.inklestudios.com/ink/


ink - inkle's narrative scripting language

Support us! ink is the product of years of thought, design, development and testing. If ink has proved useful to you, please consider making a donation to help us continue to develop the tool. Thank you!

www.inklestudios.com


나는 상호작용 버튼을 눌렀을 때 레이케스트를 실행하고 만약 상호작용 가능한 객체라면 상호작용했을 때의 함수를 호출해주는 식으로 만들어보았다.

 // 상호작용 콜백함수
 public void Perform(InputAction.CallbackContext context)
 {

     InteractWithObject();
 }

 private void InteractWithObject()
 {
     DebugEx.Log($"InteractStarted");
     RaycastHit2D hit = Physics2D.Raycast(transform.position, facingDirection, interactDistance, LayerMask.GetMask("Interactable"));

     if (hit.collider != null)
     {
         IInteractable interactable = hit.collider.GetComponent<IInteractable>();
         if (interactable != null)
         {
             interactable.Interact();
         }
     }
 }
 
  private void OnDrawGizmos()
 {
     // 레이케스트 시각화
     Gizmos.color = Color.green;
     Gizmos.DrawLine(transform.position, transform.position + (Vector3)facingDirection * interactDistance);
 }


private void OnEnable()
{
    playerInputActions.PlayerAction.Interact.performed += Perform;
    playerInputActions.Enable();
}


그리고 이와 상호작용할 수 있도록 인터페이스를 하나 만들어주었다. 상호가능한 객체라면 이 인터페이스를 상속받게 하여 상호작용했을 때의 이벤트를 실행하도록 해주었다.

namespace Controllers.Entity
{
    public interface IInteractable
    {
        /// <summary>
        /// IInteractable의 필수 구현 사항
        /// </summary>
        void Interact();
    }
}


대화창이 출력되고 대화에 대한 정보를 관리해줄 DialogueManager를 만들어주자. 

using Ink.Runtime;
using System.Collections;
using System.Collections.Generic;
using UnityEngine;
using UnityEngine.EventSystems;

public class DialogueManager : MonoBehaviour
{
    [Header("NPC Data")]
    private npcData npcdata;
    public Story currentStory;

    private const string SPEAKER_TAG = "speaker";                   //테그값들 테그값 : 변수
    private const string PORTRAIT_TAG = "portrait";

    public UI_DialoguePopup popup;

    public bool dialogueIsPlaying { get; private set; }             //현재 대화창에 진입했는지 확인할 변수

    private void Awake()
    {
        dialogueIsPlaying = false;
    }


    public void GetTalk2(TextAsset dialogue, npcData npc)
    {
       
        Player player = Managers.Game.GetPlayer().GetComponent<Player>();
        npcdata = npc;
        currentStory = new Story(dialogue.text);
        popup = Managers.UI.ShowPopupUI<UI_DialoguePopup>();

        //태그 초기화
        dialogueIsPlaying = true;
        ContinueStory();
    }

    public void ContinueStory()
    {
        if (currentStory.canContinue) //더 보여줄 이야기가 있다면
        {
            popup.displayNameText.text = npcdata.getName();
            popup.dialogueText.text = currentStory.Continue();  // 한줄 출력
        }
        else
        {
            ExitDialogueMode();
        }
    }

    private void ExitDialogueMode()
    {
        dialogueIsPlaying = false;
        popup.dialogueText.text = "";
        Managers.UI.ClosePopupUI();
    }
}

그리고 npc에 관한 정보를 담고 이 상호작용 인터페이스를 상속받는 npcdata 클래스를 만들어주었다. 이때 

using Controllers.Entity;
using System;
using System.Collections;
using System.Collections.Generic;
using UnityEngine;
using VInspector;

public class npcData : MonoBehaviour, IInteractable
{
    [Tab("Visual Cue")]
    [SerializeField] public GameObject[] visualCue;
    [Tab("NPC Inform")]
    [SerializeField] private int npcId;
    [SerializeField] private string npcName;
    [SerializeField] private bool isNpc;
    [SerializeField] public Sprite[] npcPortrait;
    [SerializeField] private TextAsset dialogue;
    public bool playerInRange;

    public string getName() { return npcName; }

    private void Awake()
    {
        playerInRange = false;
        foreach (GameObject cue in visualCue)
        {
            cue.SetActive(false);
        }
    }


    private void OnCollisionEnter2D(Collision2D collision)
    {
        if (collision.gameObject.CompareTag("Player"))
        {
            playerInRange = true;
        }
    }

    private void OnCollisionExit2D(Collision2D collision)
    {
        if (collision.gameObject.CompareTag("Player"))
        {
            playerInRange = false;
        }
    }


    public void Interact()
    {
        if (playerInRange && !Managers.Dialogue.dialogueIsPlaying)
        {
           Managers.Dialogue.GetTalk2(dialogue, this);
        }
        else if (playerInRange && Managers.Dialogue.dialogueIsPlaying)
        {
            Managers.Dialogue.ContinueStory();
        }

    }
}


이렇게 해준 다음 대화창 이미지를 관리해줄 클래스도 만들어주자

using System;
using System.Collections;
using System.Collections.Generic;
using TMPro;
using UnityEngine;
using UnityEngine.EventSystems;
using UnityEngine.UI;

public class UI_DialoguePopup : UI_Popup
{
    [SerializeField] private GameObject DialoguePopup;
    [SerializeField] public GameObject dialoguePanel;
    [SerializeField] public TextMeshProUGUI dialogueText;
    [SerializeField] public TextMeshProUGUI displayNameText;
    [SerializeField] public Image portraitImage;

    [SerializeField] public TextMeshProUGUI[] choicesText;
    [SerializeField] public GameObject[] choices;
    [SerializeField] public GameObject choicep;
    [SerializeField] public Button[] choiceButton;
    private bool isAction;

    public override void Init()
    {
        DialoguePopup = this.gameObject;
        dialoguePanel = DialoguePopup.transform.GetChild(0).gameObject;
        dialogueText = dialoguePanel.transform.GetChild(0).gameObject.GetComponent<TextMeshProUGUI>();
        displayNameText = dialoguePanel.transform.GetChild(3).GetChild(0).GetComponent<TextMeshProUGUI>();
        portraitImage = dialoguePanel.transform.GetChild(4).GetComponent<Image>();

        choicep = dialoguePanel.transform.GetChild(2).gameObject;
        choices = new GameObject[2] { dialoguePanel.transform.GetChild(2).GetChild(0).gameObject, dialoguePanel.transform.GetChild(2).GetChild(1).gameObject };
        choicesText = new TextMeshProUGUI[2] { choices[0].GetComponentInChildren<TextMeshProUGUI>(), choices[1].GetComponentInChildren<TextMeshProUGUI>() };
        choiceButton = new Button[2] { choices[0].GetComponent<Button>(), choices[1].GetComponent<Button>() };
    }

    private void Awake()
    {
        Init();
    }
   
}


이렇게 해주면 대화창이 올바르게 출력되는 것을 볼 수 있다.


강의

https://inf.run/zKor1


학습 페이지


www.inflearn.com


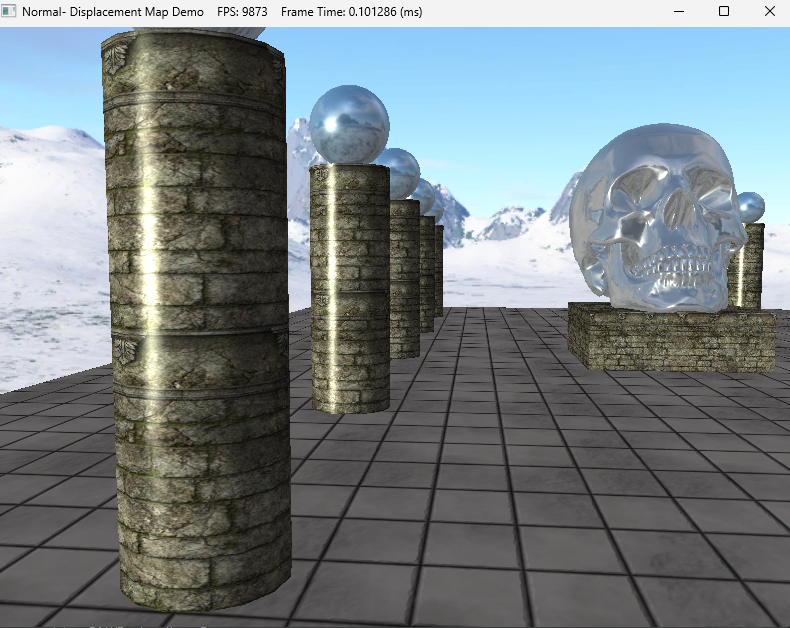
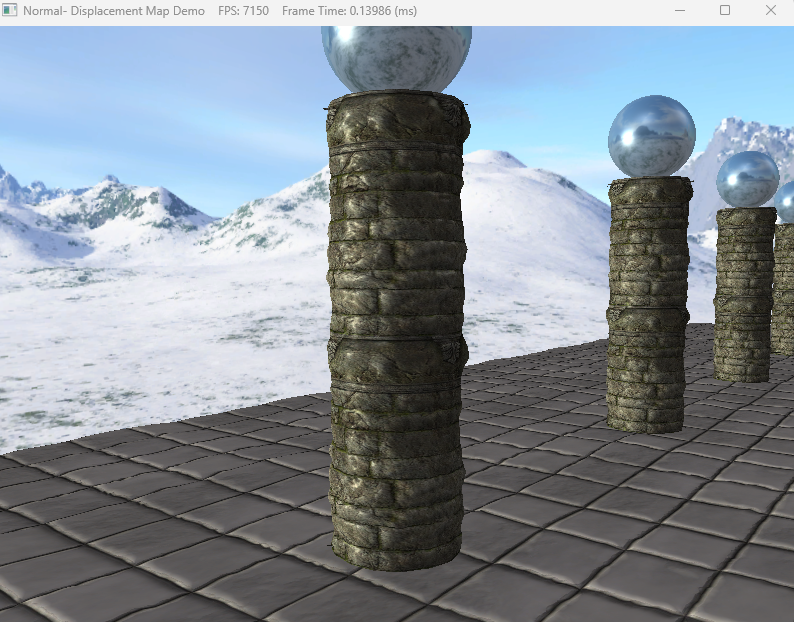
오늘은 Normal Mapping 과 Displacement Mapping에 대해 학습하고 예제코드를 분석해보자.

우선 Normal Mapping은 물체를 정밀하게 표현하기 위해서는 삼각형의 개수를 늘리는 방법도 있지만 이 방법은 너무 부하가 많아진다. 그렇기 때문에 삼각형의 개수를 늘리지 않고 물체 표면의 Normal 값을 조정해주는 것으로 물체의 표면을 정밀하게 표현한다. 

이때 조정할 노멀 값을 모아서 노말 텍스처를 만들어주게 되는데 이때 텍스처에는 tagent Space 좌표계가 적용되어 있는데 이때 n(normal)값이 제일 많기 때문에 파란색으로 표현되곤 한다. 이 텍스처의 normal값을 추출해서 물체에 적용해주면 된다.

우선 코드를 실행시켜보면 왼쪽에는 Normal Mapping이 적용되지 않은 모습이고 오른쪽에는 Normal Mapping이 적용된 모습이다.


보통 노멀매핑은 24비트로 8비트씩 나눠서 3개의 좌표를 사용한다. 1바이트이기 때문에 각 값은 0~1사이의 값으로

표현한다. 이를 float -1~1까지의 값으로 치환해주는 공식을 통해 치환해주게 된다.

이때 tagent space라는 개념이 나오는데 이 정보는 매쉬의 정점에 포함된 정보로 이 좌표계를 기준으로 하는 x,y,z정보를 텍스처공간에 저장해주고 이 값을 통해 Normal Mapping을 해주는 것이다. 이때  정점 정보를 입력해줄 때 VertexIn 구조체의 정보와 같이 노멀정보와 탄젠트 정보를 넣어주어야한다. 


예제 코드에서 쉐이더 부분을 살펴보자면 노멀 정보를 가져와서 월드좌표로 바꿔주는 부분이 함수로 만들어져있고 이를 PS단계에서 호출하여 사용해주고 있다.

struct VertexIn
{
    float3 PosL     : POSITION;
    float3 NormalL  : NORMAL;
    float2 Tex      : TEXCOORD;
    float3 TangentL : TANGENT;
};

struct VertexOut
{
    float4 PosH     : SV_POSITION;
    float3 PosW     : POSITION;
    float3 NormalW  : NORMAL;
    float3 TangentW : TANGENT;
    float2 Tex      : TEXCOORD;
};

VertexOut VS(VertexIn vin)
{
    VertexOut vout;

    // Transform to world space space.
    vout.PosW = mul(float4(vin.PosL, 1.0f), gWorld).xyz;
    vout.NormalW = mul(vin.NormalL, (float3x3)gWorldInvTranspose);
    vout.TangentW = mul(vin.TangentL, (float3x3)gWorld);

    // Transform to homogeneous clip space.
    vout.PosH = mul(float4(vin.PosL, 1.0f), gWorldViewProj);

    // Output vertex attributes for interpolation across triangle.
    vout.Tex = mul(float4(vin.Tex, 0.0f, 1.0f), gTexTransform).xy;

    return vout;
}

Texture2D gNormalMap;

float3 normalMapSample = gNormalMap.Sample(samLinear, pin.Tex).rgb;
float3 bumpedNormalW = NormalSampleToWorldSpace(normalMapSample, pin.NormalW, pin.TangentW);


월드좌표로 변환해줄 때 텍스처에서 UV좌표를 이용하여 특정 좌표를 구한다음에 그 값을 -1~1사이의 값으로 공식을 통해 변환해준 다음 월드좌표로 변환해주고 있다. 이때 이미 VS값에서 World를 구해줬지만 PS단계에서 보간때문에 normal과 tagent의 수직이 깨질 수 있기 때문에 이를 수정해주기 위해 탄젠트 값을 다시 연산을 해준 다음 탄젠트 스페이스에서 월드 스페이스로 변환해주고 있다.

//---------------------------------------------------------------------------------------
// Transforms a normal map sample to world space.
//---------------------------------------------------------------------------------------
float3 NormalSampleToWorldSpace(float3 normalMapSample, float3 unitNormalW, float3 tangentW)
{
	// Uncompress each component from [0,1] to [-1,1].
	float3 normalT = 2.0f * normalMapSample - 1.0f;

	// Build orthonormal basis.
	float3 N = unitNormalW;
	float3 T = normalize(tangentW - dot(tangentW, N) * N);
	float3 B = cross(N, T);

	float3x3 TBN = float3x3(T, B, N);

	// Transform from tangent space to world space.
	float3 bumpedNormalW = mul(normalT, TBN);

	return bumpedNormalW;
}


그리고 이렇게 변환된 값을  통해 빛연산을 해주고 있다.

// Sum the light contribution from each light source.  
[unroll]
for (int i = 0; i < gLightCount; ++i)
{
    float4 A, D, S;
    ComputeDirectionalLight(gMaterial, gDirLights[i], bumpedNormalW, toEye,
        A, D, S);

    ambient += A;
    diffuse += D;
    spec += S;
}

litColor = texColor * (ambient + diffuse) + spec;

if (gReflectionEnabled)
{
    float3 incident = -toEye;
    float3 reflectionVector = reflect(incident, bumpedNormalW);
    float4 reflectionColor = gCubeMap.Sample(samLinear, reflectionVector);

    litColor += gMaterial.Reflect * reflectionColor;
}


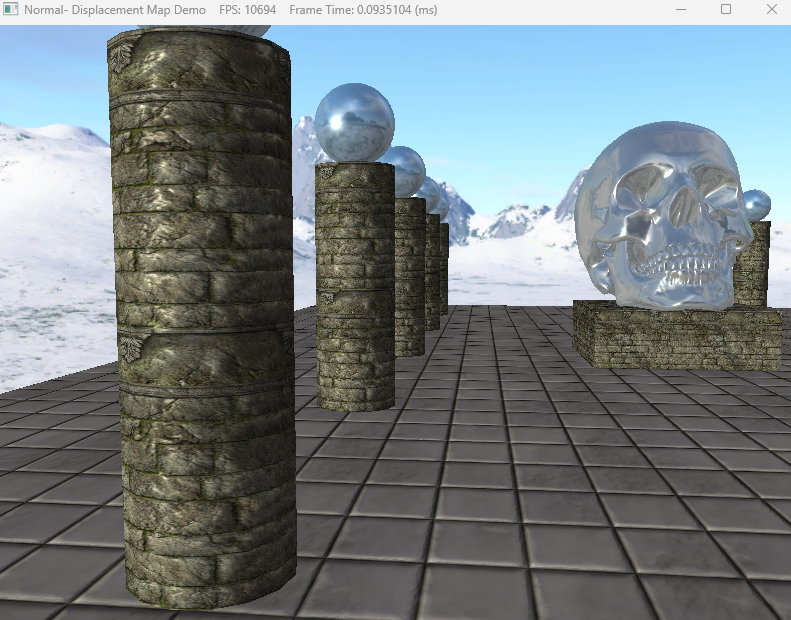
다음은 Displacement Mapping 표면에 굴곡과 균열을 묘사하는 높이 값을 넘겨주고 이를 통해 기하구조를 변경하는 것이다. 구현은 노멀매핑에서 w값을 height로 사용하거나 따로 텍스처를 만들어주면 된다. 왼쪽이 Normal Mapping만 적용된 화면이고 오른쪽이 Displacement Mapping까지 적용된 모습이다.


이 표면의 높이값을 실시간으로 조정해주기 위해서는 매쉬를 직접 조정해주는 방법도 있지만 이렇게 하면 부하가 심해지기 때문에 정점을 건드리지 않고 조정해줄 방법을 찾아야하는데 Tesellation 단계를 통해 조정을 해준다. 


코드를 보면 예제에서는 노멀 텍스처w값을 추출해서 사용하는 것을 볼 수 있다.

Texture2D gNormalMap;


PatchTess PatchHS(InputPatch<VertexOut, 3> patch,
    uint patchID : SV_PrimitiveID)
{
    PatchTess pt;

    // Average tess factors along edges, and pick an edge tess factor for 
    // the interior tessellation.  It is important to do the tess factor
    // calculation based on the edge properties so that edges shared by 
    // more than one triangle will have the same tessellation factor.  
    // Otherwise, gaps can appear.
    pt.EdgeTess[0] = 0.5f * (patch[1].TessFactor + patch[2].TessFactor);
    pt.EdgeTess[1] = 0.5f * (patch[2].TessFactor + patch[0].TessFactor);
    pt.EdgeTess[2] = 0.5f * (patch[0].TessFactor + patch[1].TessFactor);
    pt.InsideTess = pt.EdgeTess[0];

    return pt;
}

struct HullOut
{
    float3 PosW     : POSITION;
    float3 NormalW  : NORMAL;
    float3 TangentW : TANGENT;
    float2 Tex      : TEXCOORD;
};

[domain("tri")]
[partitioning("fractional_odd")]
[outputtopology("triangle_cw")]
[outputcontrolpoints(3)]
[patchconstantfunc("PatchHS")]
HullOut HS(InputPatch<VertexOut, 3> p,
    uint i : SV_OutputControlPointID,
    uint patchId : SV_PrimitiveID)
{
    HullOut hout;

    // Pass through shader.
    hout.PosW = p[i].PosW;
    hout.NormalW = p[i].NormalW;
    hout.TangentW = p[i].TangentW;
    hout.Tex = p[i].Tex;

    return hout;
}


struct DomainOut
{
    float4 PosH     : SV_POSITION;
    float3 PosW     : POSITION;
    float3 NormalW  : NORMAL;
    float3 TangentW : TANGENT;
    float2 Tex      : TEXCOORD;
};

//테셀레이션- 최종 위치결정
[domain("tri")]
DomainOut DS(PatchTess patchTess,
    float3 bary : SV_DomainLocation,
    const OutputPatch<HullOut, 3> tri)
{
    DomainOut dout;

    dout.PosW = bary.x * tri[0].PosW + bary.y * tri[1].PosW + bary.z * tri[2].PosW;
    dout.NormalW = bary.x * tri[0].NormalW + bary.y * tri[1].NormalW + bary.z * tri[2].NormalW;
    dout.TangentW = bary.x * tri[0].TangentW + bary.y * tri[1].TangentW + bary.z * tri[2].TangentW;
    dout.Tex = bary.x * tri[0].Tex + bary.y * tri[1].Tex + bary.z * tri[2].Tex;

    dout.NormalW = normalize(dout.NormalW);


    const float MipInterval = 20.0f;
    float mipLevel = clamp((distance(dout.PosW, gEyePosW) - MipInterval) / MipInterval, 0.0f, 6.0f);

    //텍스처에서 height 추출
    float h = gNormalMap.SampleLevel(samLinear, dout.Tex, mipLevel).a;

    //포지션 조정
    dout.PosW += (gHeightScale * (h - 1.0)) * dout.NormalW;

      //포지션 조정
    dout.PosH = mul(float4(dout.PosW, 1.0f), gViewProj);

    return dout;
}

+ Recent posts