내가 코딩을 배우고 코딩으로 무엇인가를 만드는 걸 목표로 하게 되었을 때부터 내 오랜 목표는 누구나 쉽고 재밌게 즐길 수 있는 게임(RPG)를 만드는 것이다. 그리고 나는 현실처럼 많은 상호작용을 게임안에서 할 수 있고 또 다른 세상을 유저가 만들어가기도 하고 게임을 진행하는 데 있어서 하나의 루트만 존재하는 것이 아니라 유저에 따라 여러루트가 존재할 수 있는 그런 게임을 만들고 싶다.
그렇게 꿈을 향해서 나아가던 중에 몰입에 있어서 중요한 역활을 하는 게임 난이도를 AI가 바꿀 수 있으면 어떨까라는 생각을 친구와 나누게 되었고 이 아이디어를 실제로 학기 중에 공부하고 구현해보자 라는 계획을 세우게 되었다. 그래서 나와 친구는 학교에 직접 한 학기의 수업을 만들어서 진행할 수 있는 것이 있어서 유저의 게임실력을 받아서 게임의 난이도를 유저에 맞게 변경해주는 것을 만들기로 하였다.
처음에는 rpg게임으로 구현을 해보려 했지만 생각보다 시간이 많이 소요될 것 같고 게임보다는 실제로 작동하는 AI모델을 만들어 보려고했기때문에 이러한 데이터를 더 잘 받을 수있는 뱀서라이크 게임을 만들어서 모델에 사용하기로 하였다. 그래서 뱀서라이크 게임을 만드는 영상을 찾다가 골드메탈님의 영상을 보게 되었고 이것을 바탕으로 우리의 팀만의 차별성(여러스테이지, 몬스터종류의 차별성)을 조금 넣어서 모델에 넣어보자는 결론이 나왔다.
이 문서에 보면 신규 사용자 가입이라는 항목이 있다. 이 항목 코드를 가져와서 사용해주는데 만약 이름이나 사진을 넣어주고 싶다면 가입하는 코드 내에서 회원가입이 정상적으로 이루진 후에 유저의 정보에 이름과 사진을 추가해주는 코드가 들어가도록 구현해주면 된다.
mAuth.createUserWithEmailAndPassword(email, password)
        .addOnCompleteListener(this, new OnCompleteListener<AuthResult>() {
            @Override
            public void onComplete(@NonNull Task<AuthResult> task) {
                if (task.isSuccessful()) {
                    // Sign in success, update UI with the signed-in user's information
                    Log.d(TAG, "createUserWithEmail:success");
                    FirebaseUser user = mAuth.getCurrentUser();
                    updateUI(user);
                } else {
                    // If sign in fails, display a message to the user.
                    Log.w(TAG, "createUserWithEmail:failure", task.getException());
                    Toast.makeText(EmailPasswordActivity.this, "Authentication failed.",
                            Toast.LENGTH_SHORT).show();
                    updateUI(null);
                }
            }
        });
이 email과 password에 우리의 값을 넣어서 isSuccessful 시에 회원가입 시 성공인 화면이 나올 수 있도록 만들어 보겠다.
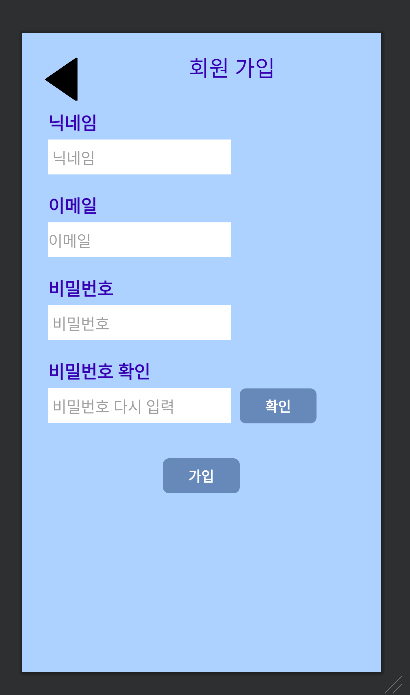
유저 닉네임과 아이디 비밀번호를 EditText로 유저가 직접 입력할 수 있도록 하였다. 그리고 비밀번호 확인버튼과 뒤로가기 버튼, 회원가입 버튼을 만들어서 누를 수 있게 구현하였다. 밑은 실제로 구현된 화면이다.
이 EditText에 있는 값을 가져온 다음 위에 있던 함수와 똑같이 작성해준다음 매개변수만 우리의 값으로 대체해 준다.
String mypw=pw.getText().toString();
String mypw2=pw2.getText().toString();
String myemail=email.getText().toString();
String myname=name.getText().toString();
if(mypw.equals(mypw2)){
    mFirebaseAuth.createUserWithEmailAndPassword(myemail, mypw)
            .addOnCompleteListener(signUp.this, new OnCompleteListener<AuthResult>() {
                @Override
                public void onComplete(@NonNull Task<AuthResult> task) {
                    if (task.isSuccessful()) {
                        // Sign in success, update UI with the signed-in user's information
                        Toast.makeText(signUp.this, "회원가입성공",Toast.LENGTH_LONG).show();
                        FirebaseUser user = mFirebaseAuth.getCurrentUser();
                        UserProfileChangeRequest profileUpdates = new UserProfileChangeRequest.Builder()
                                .setDisplayName(myname).build();
                        user.updateProfile(profileUpdates)
                                .addOnCompleteListener(new OnCompleteListener<Void>() {
                                    @Override
                                    public void onComplete(@NonNull Task<Void> task) {
                                        if (task.isSuccessful()) {

                                        }else{
                                            Log.d(TAG, "실패.");
                                        }
                                    }
                                });

                        onBackPressed();
                    } else {
                        // If sign in fails, display a message to the user.
                        Toast.makeText(signUp.this, "회원가입 실패",Toast.LENGTH_LONG).show();
                    }
                }
            });
}else{
    Toast.makeText(signUp.this, "비밀번호가 중복체크 실패",Toast.LENGTH_LONG).show();
}
2)로그인
로그인 또한 Firebase 위의 링크의 공식문서에 잘 작성돼있다. 코드를 보자면
mAuth.signInWithEmailAndPassword(email, password)
        .addOnCompleteListener(this, new OnCompleteListener<AuthResult>() {
            @Override
            public void onComplete(@NonNull Task<AuthResult> task) {
                if (task.isSuccessful()) {
                    // Sign in success, update UI with the signed-in user's information
                    Log.d(TAG, "signInWithEmail:success");
                    FirebaseUser user = mAuth.getCurrentUser();
                    updateUI(user);
                } else {
                    // If sign in fails, display a message to the user.
                    Log.w(TAG, "signInWithEmail:failure", task.getException());
                    Toast.makeText(EmailPasswordActivity.this, "Authentication failed.",
                            Toast.LENGTH_SHORT).show();
                    updateUI(null);
                }
            }
        });
이 email과 password에 우리의 값을 넣어서 isSuccessful 시에 로그인 성공인 화면이 나올 수 있도록 만들어 보겠다.
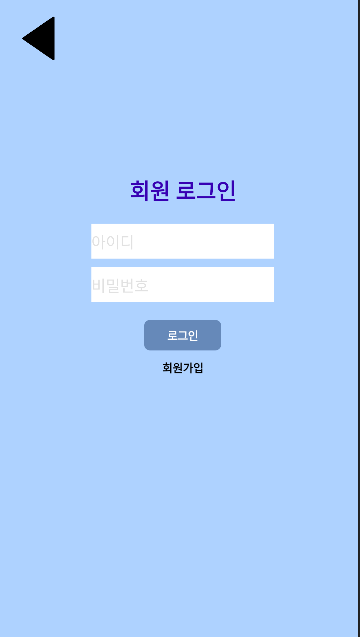
일단 기반이 되는 xml 파일을 보자면 회원가입과 동일하게 입력받는 부분이 EditText로 구현되어 있다. 또한 로그인 할 수 있는 버튼과 회원가입화면으로 넘어갈 수 있는 회원가입 글자도 클릭가능하게 만들어 주었다.
로그인 버튼을 눌렀을 때 위의 공식문서에서의 코드를 바탕으로 EditText의 값을 받아와서 함수에 넣어주면 된다.
public void onClick(View view) {
    String email=my_Id.getText().toString();
    String password=my_pw.getText().toString();
    mAuth.signInWithEmailAndPassword(email, password)
            .addOnCompleteListener(Login.this, new OnCompleteListener<AuthResult>() {
                @Override
                public void onComplete(@NonNull Task<AuthResult> task) {
                    if (task.isSuccessful()) {
                        Toast.makeText(Login.this,"로그인 성공",Toast.LENGTH_LONG).show();
                        FirebaseUser user = mAuth.getCurrentUser();
                        Intent intent=new Intent(getApplicationContext(),HomeActivity.class);
                        intent.setFlags(Intent.FLAG_ACTIVITY_NEW_TASK |  Intent.FLAG_ACTIVITY_CLEAR_TOP);//액티비티 스택제거
                        startActivity(intent);
                    } else {
                        Toast.makeText(Login.this, "로그인 실패", Toast.LENGTH_SHORT).show();
                    }
                }
            });
}
3)리뷰 및 좋아요
사실 리뷰 및 좋아요 기능을 구현하려고 할 때 어려웠던 점이 리뷰가 삭제도 가능해야하고 각 관광지의 리뷰와 각 유저간의 리뷰도 구분하여 가져올 수 있어야 하는데 어떻게 구현해야할 지 방식이 생각이 잘 나지않았다. 여러번의 시도 끝에 나는 Firestore에서 문서를 삭제할 때 문서의 ID가 있어야 되기 때문에 리뷰를 저장할 때 생성과 동시에 저장된 리뷰데이터를 불러올 때 문서의 아이디를 저장해주는 방식으로 구현하였고 유저, 관광지 구분을 위해 관광지 이름과 유저의 이메일도 같이 저장하였다.
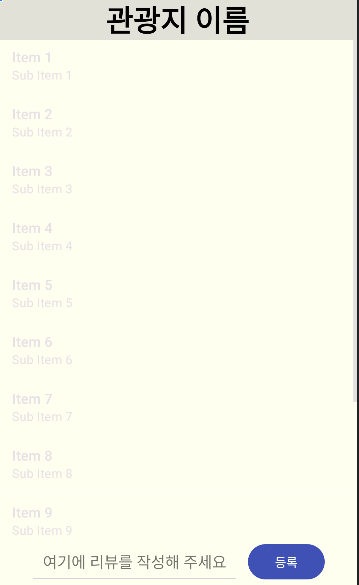
처음으로 리뷰가 보이게될 틀이 될 xml을 구현해 보았다. 이 리뷰페이지는 관광지 이름을 위에 띄우고 리스트뷰로 리뷰가 리스트형태로 유동적으로 나올 수 있게 만들었다. 그리고 제일 밑에는 리뷰를 작성할 수있게 EditText, 저장할 수 있게 버튼을 붙여 주었다.
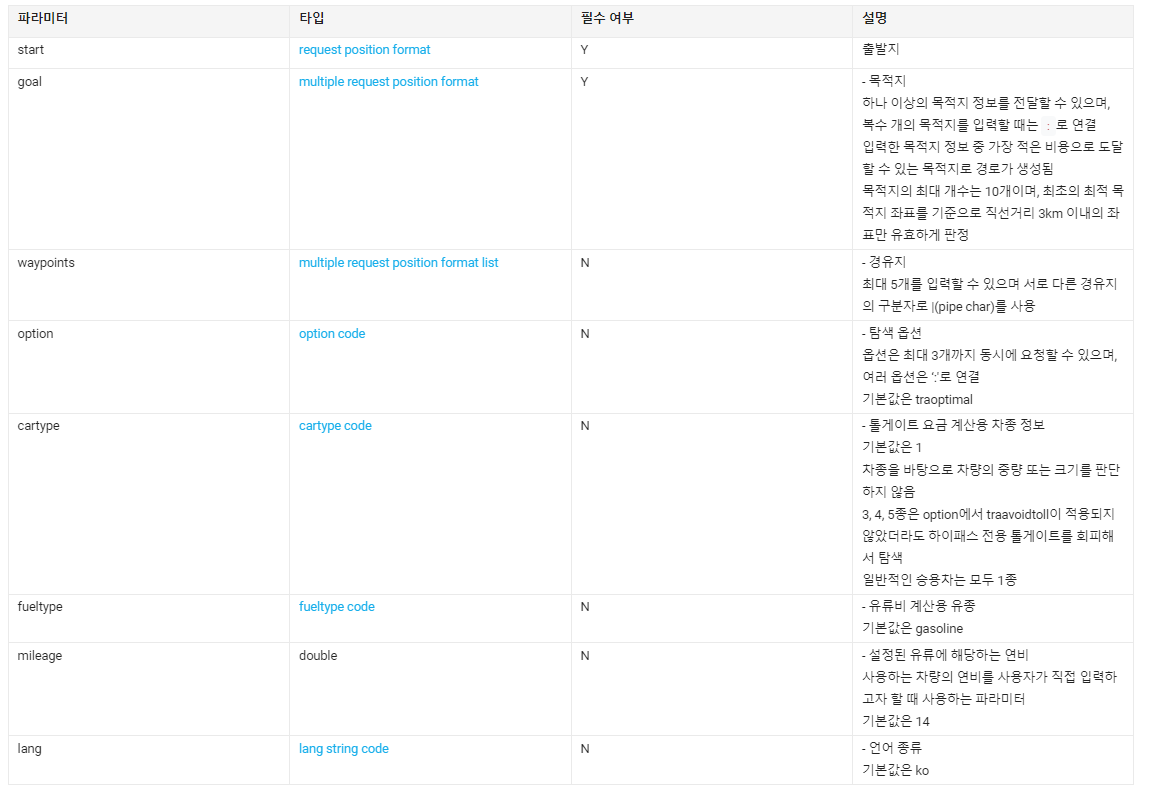
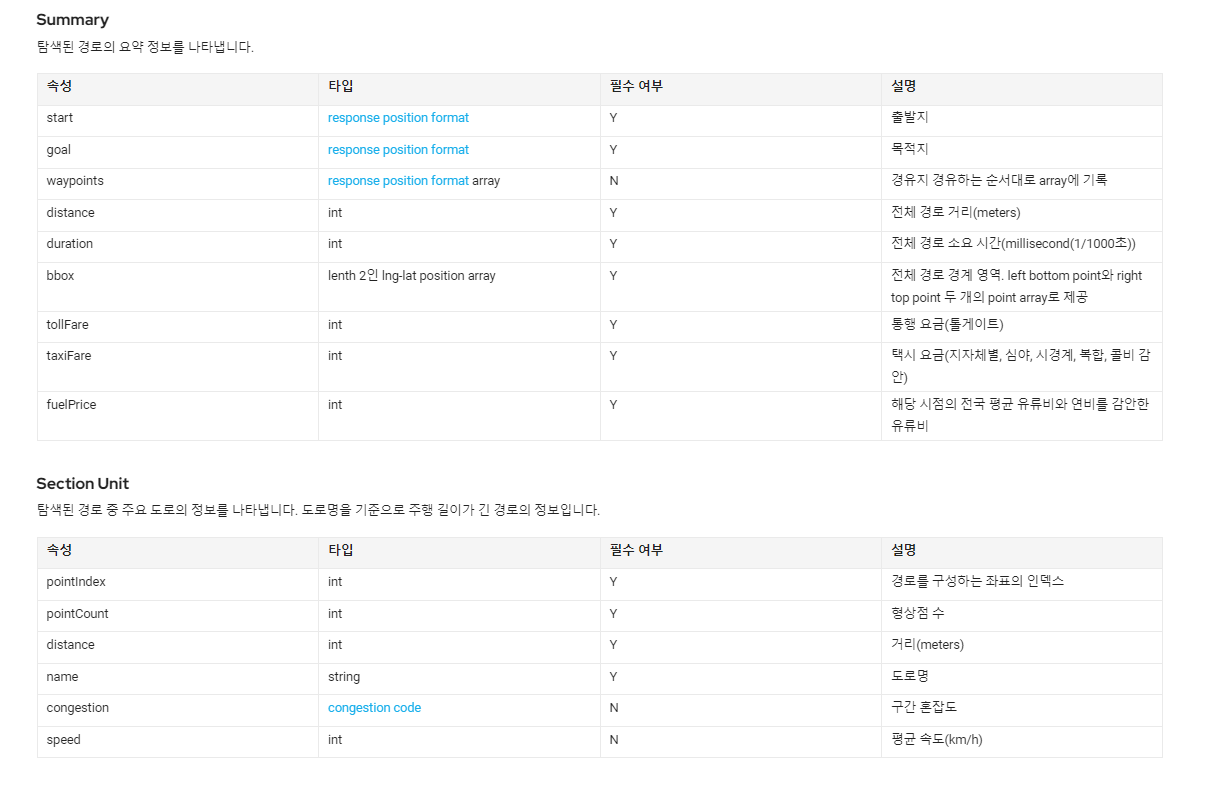
Directions 5는 네이버에서 지원하는 Rest API 중 하나로 출발지 목적지 및 경유지(선택 사항 최대 5개)의 정보를 보내면 응답으로 경로 데이터배열을 받는다.
1-1)사용법
Rest API의 사용법에서 가장 중요한 것은 요청 파라미터와 헤더를 Interface로 구현하고 응답바디를 Class로 구현 하는 것이다. Directions 5 공식문서에 보면
이런 식으로 요청 파라미터, 요청헤더, 요청 바디가 있다. 요청 파라미터와 헤더를 살펴보자
요청 파라미터요청헤더
보통 헤더는 해당 사이트의 Rest API를 사용하는 경우라면 비슷하거나 같은 경우가 많은 것 같다. 그래서 우리가 중요하게봐야하는 항목은 파라미터 부분이다. 파라미터에 이름들을 전부 공식문서의 이름들과 똑같이 해주어야 한다. 오타나 다르게 하면 작동하지 않는다.. 또한 필수 여부에 Y라고 되어있는 파라미터는 필수적으로 넣어줘야하고 부가적으로 더 얻고 싶은 정보가 있다면 넣어주면 된다. 또한 Rest API는 전부 String 형태로 서버에 요청을 보내기 때문에 파라미터의 자료형은 String으로 맞춰주면 된다.
이건 내가 만든 Driving5의 요청 Interface이다. 여기서 Call은 Rest API를 호출할때 사용되는 명으로 나중에 다루기로 한다. 또한 RoutePath는 응답바디를 구성하는 Class 명이다. 그리고 getData라는 메소드를 만들어서 이를 통해 서버에 요청을 보낼 수 있다. @Get 부분은 서버에 정보를 요청하는 부분인데 @GET("API URL에서 끝에 들어가는부분 ")이다 예를 들어
●헤더부분은 @Header ("헤더명") 자료형 변수명 으로 구현 ● 파라미터 부분은 @Query("파라미터명") 자료형 변수명 으로 구현
■요청바디
요청바디 또한 공식문서를 보면
요청 바디
요청바디는 Class로 구현하는데 필수여부로 돼있는 부분은 필수적으로 다 구현해주어야한다. 또한 이름도 응답바디의 속성명과 똑같이 해주어야 한다. 그리고 변수별로 get메서드를 적어주어야 한다. 타입을 보면 이해하기 어려울 수 있는데 이때는 응답 예시를 보는게 쉬울 수 있다. 예시 응답 또한 공식문서에 첨부되어 있다.
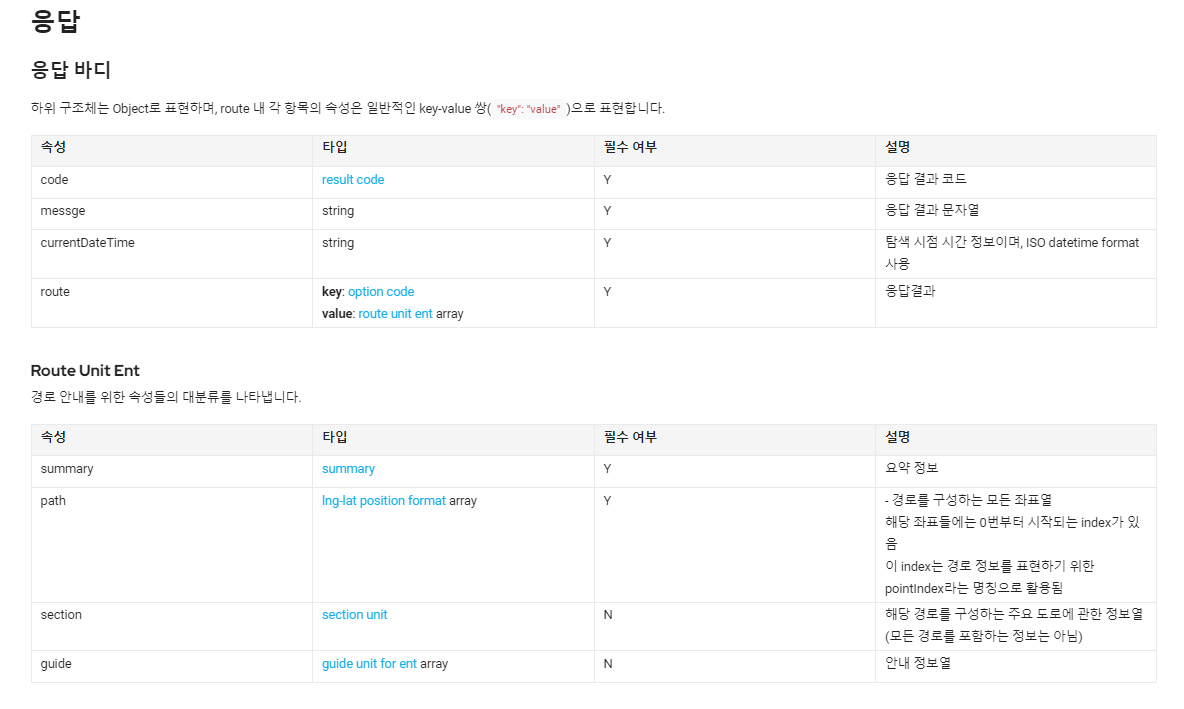
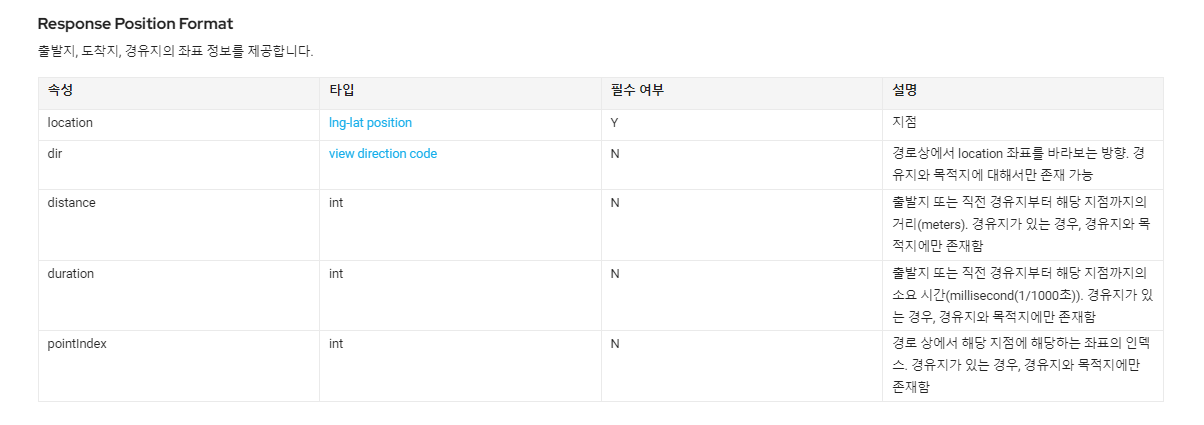
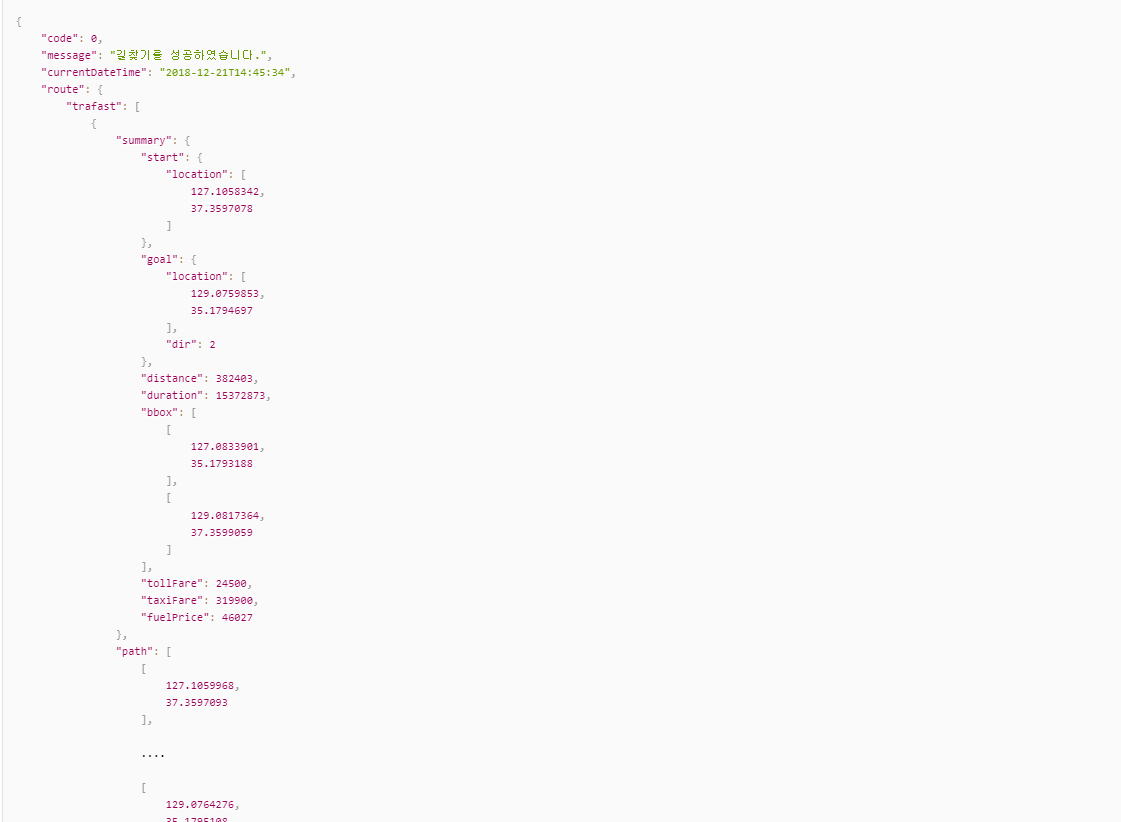
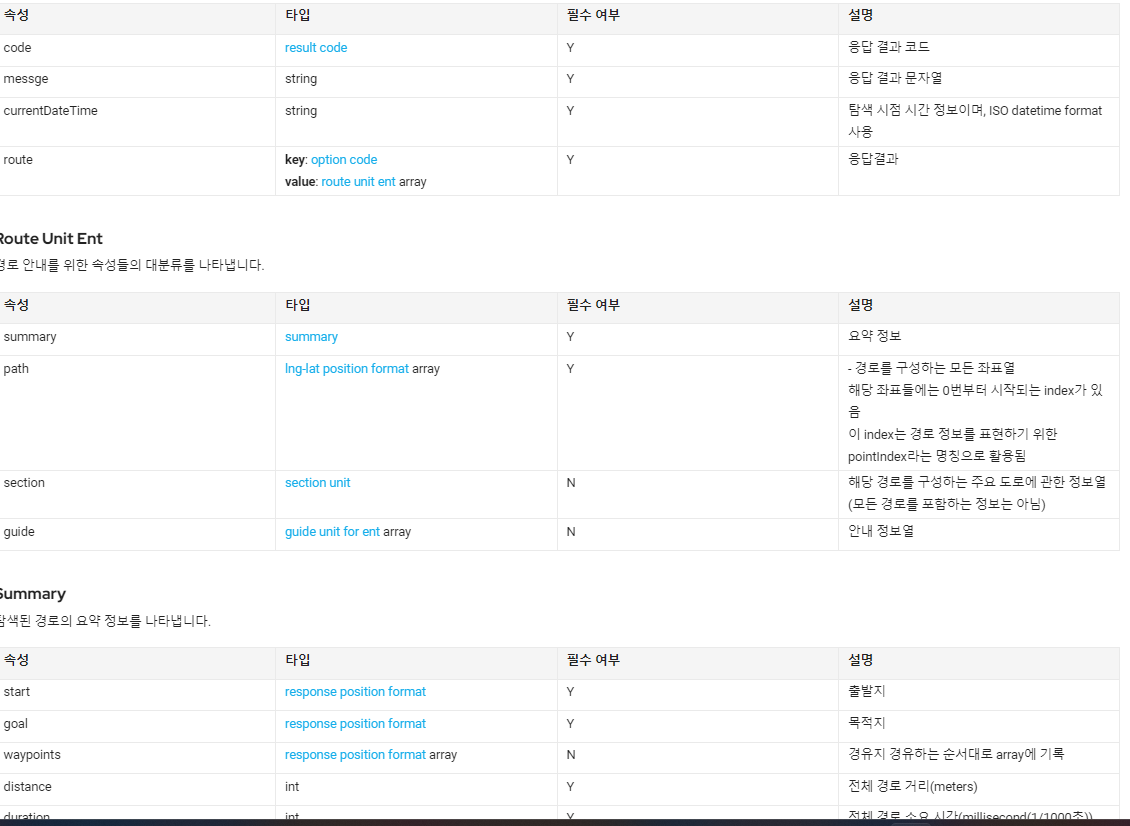
String처럼 자료형이 정해져있는 경우엔 그대로 쓰면 되지만 route 같이 자료형이 이해하기 어려운 경우엔 응답 예시를 보면 route 안에 trafast가 있다. 이 trafast는 위의 요청 파라미터에서 무엇을 요청했는지에 따라 달라지는데 기본값은 traoptimal 이다. 그리고 trafast안에는 summary path 가 있다. 이러한 것을 Class로 구현하려면 Class를 여러개로 만들어야한다.
public class RoutePath {
    @SerializedName("code")
    @Expose
    private int code;
    @SerializedName("messge")
    @Expose
    private String messge;

    @SerializedName("currentDateTime")
    @Expose
    private String currentDateTime;

    @SerializedName("route")
    @Expose
    private Route route;

    public int getCode() {
        return code;
    }

    public Route getRoute() {
        return route;
    }

    public String getCurrentDateTime() {
        return currentDateTime;
    }

    public String getMessge() {
        return messge;
    }

}

class Route{
    @SerializedName("traoptimal")
    @Expose
    private List<Traoptimal> traoptimal;

    public List<Traoptimal> getTraoptimal() {
        return traoptimal;
    }
}

class Traoptimal{
    @SerializedName("summary")
    @Expose
    private Summary summary;
    @SerializedName("path")
    @Expose
    private List<List<Double>> path;

    public Summary getSummary() {
        return summary;
    }

    public List<List<Double>> getPath() {
        return path;
    }
}

class Summary{
    @SerializedName("start")
    @Expose
    private Start start;
    @SerializedName("goal")
    @Expose
    private Goal goal;

    @SerializedName("distance")
    @Expose
    private int distance;

    public Goal getGoal() {
        return goal;
    }
이게 예시 응답과 공식문서를 참고하여 만든 Class이다. 보면 Route라는 Class를 만들어서 자료형 처럼 사용하고 있고 그 밑에 여러 Class 및 기본 자료형을 두어서 필수 여부에 Y가 돼있는 것을 다 만들어 주고 Get 메서드까지 달아 주었다. 이렇게 Interface와 Class를 만들어 주었다면 이제 실제로 Retrofit을 통해 호출해 보자
■Retrofit Retrofit은 Rest API를 사용할 때 쓰는 것으로 사용방법은 1) 의존성 추가
이 코드는 Rest API를 통해 서버에 출발 지 목적지 위경도를 주어서 거기까지의 경로를 선으로 그리고 출발지 목적지에 마커를 찍는 코드이다. 사용할 때 Retrofit 을 선언해주고 .baseUrl 부분에 서버에 요청을 보낼 baseUrl 즉 v1/driving 앞에 부분을 넣어주고 RouteFind_nomid 클래스를 선언해준 Retrofit의 .create 메서드 안에 넣어준다. 그리고 Call 을 선언해서 앞에 선언한 Retrofit이 Interface의 getData의 값을 받게된다. 그래서 getData안에 헤더값과 요청하고자 하는 값을 넣어주면 선언 해준 call0로 enque를 보내서 response를 통해 결과값 즉 응답값을 받게 된다. 보면 RoutePath 우리가 선언해준 Class에 response.body() 즉 응답바디를 넣으면 우리가 선언해둔 값들을 사용할 수 있게 되는 것이다.
경남드리는 경상남도 관광앱으로 사용자가 경상남도의 지역을 출발지, 목적지에 입력하고 테마를 선택하여 경로 만들 수 있게 하는 사용자 맞춤형 여행 설계 앱이다. 경남드리의 주요 기능에는 여행지 설계 기능, 리뷰기능, 여행지 추천기능이 있다. 이 기능들을 구현하면서 배운 것들에 대해 적어보려고 한다.
1. 여행지 설계기능
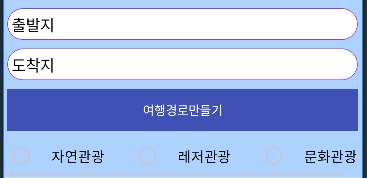
1-1. 홈화면
처음 홈화면에는 AutoCompleteTextView로 출발지와 도착지를 타이핑할 수 있게 만들었으며, RadioGroup을 활용하여 원하는 테마를 선택할 수 있게 만들었다. 여기서 AutoCompleteTextView에 자동완성이 뜨게 하려면 Adapter 를 붙여 주어야한다 일단 xml에 AutoCompleteTextView를 만든다음
여기서는 settingList()라는 함수를 만들어서 searchList에 값을 추가해서 각 출발 목적지 자동완성뷰에 넣어주었다.
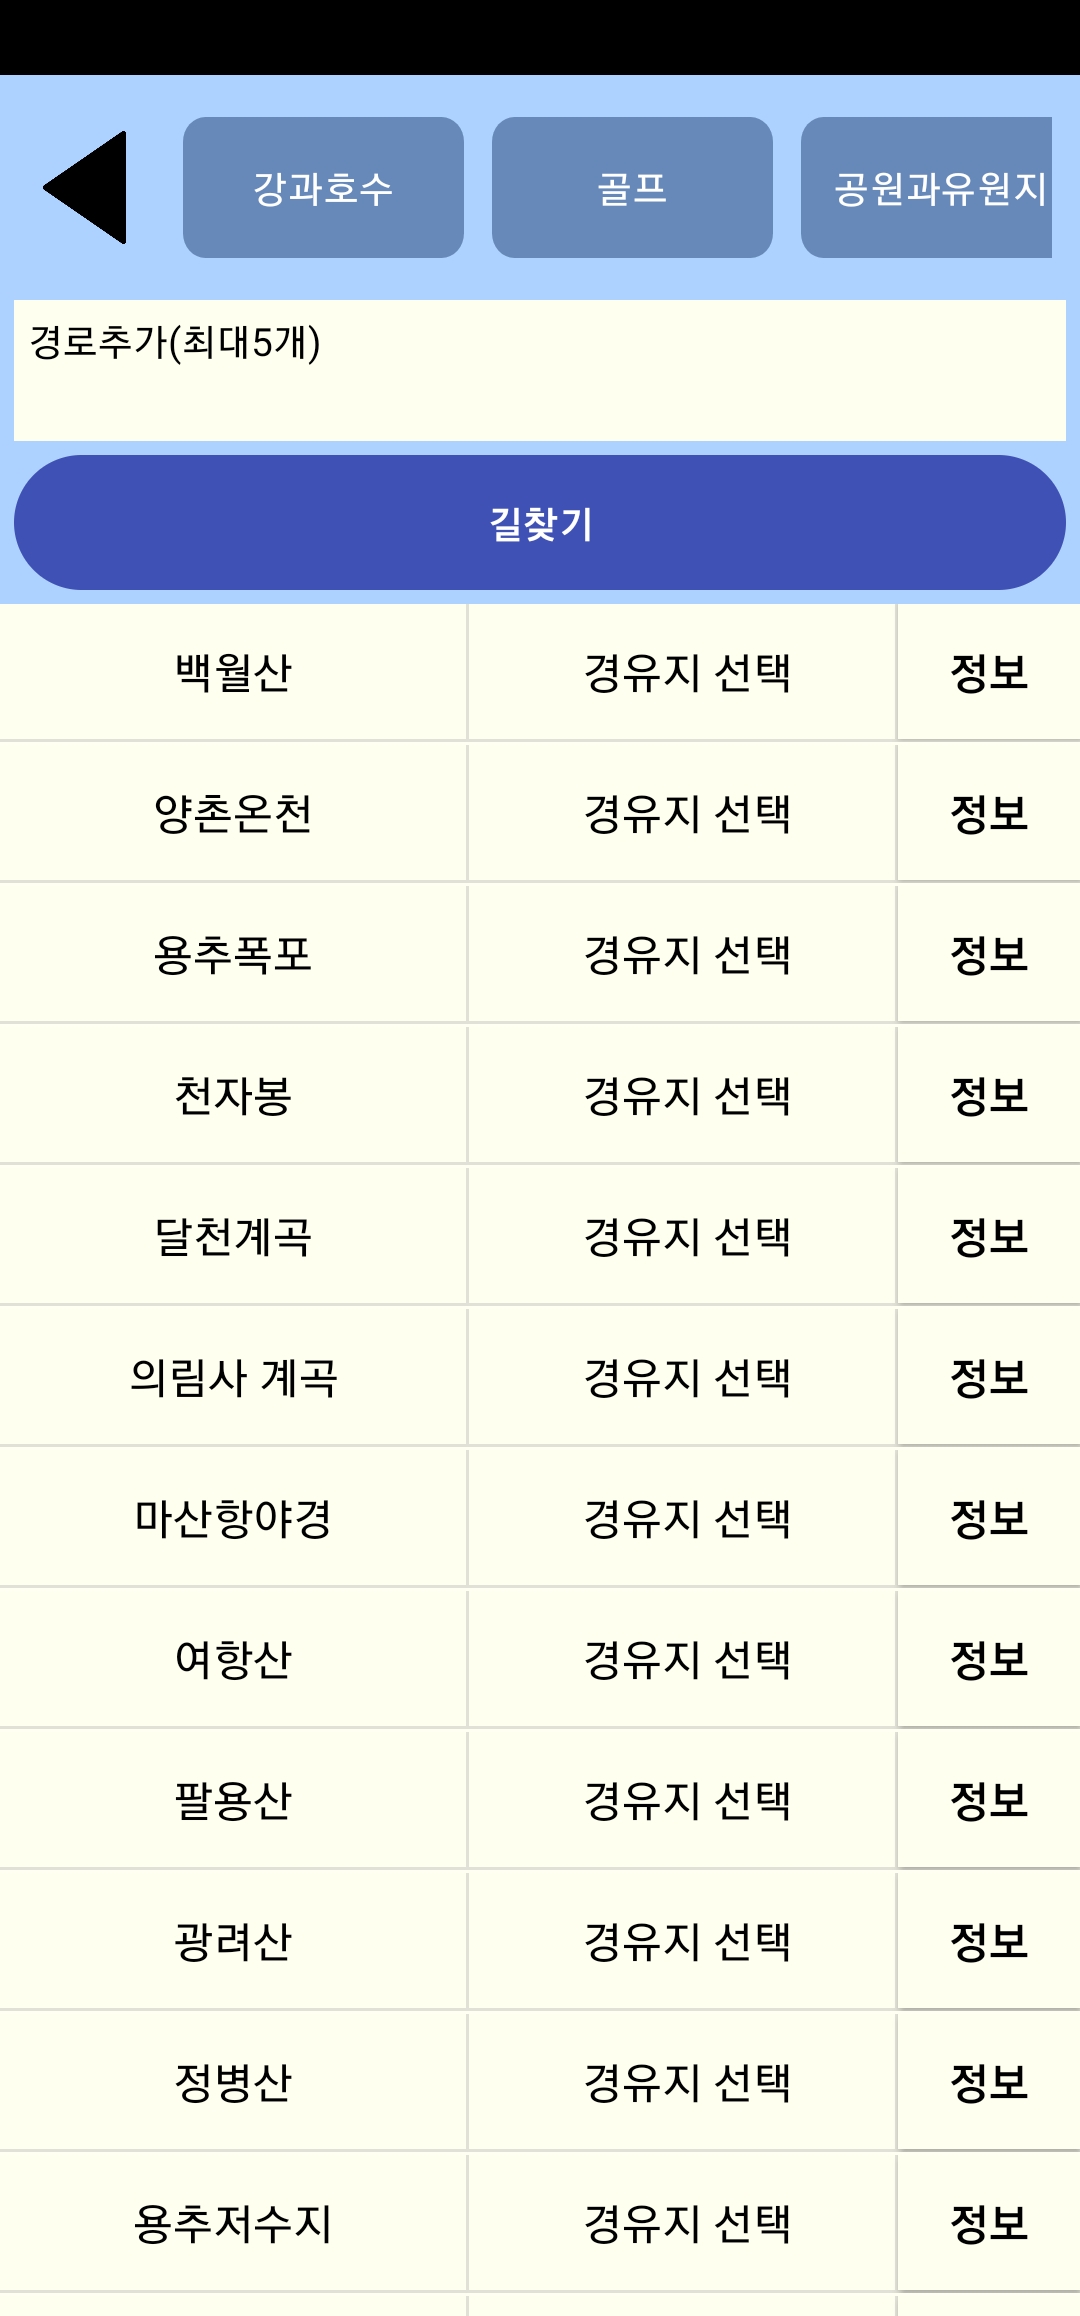
1-2.경로선택화면
출발지와 도착지를 설정하고 버튼을 클릭했을 때 테마별 가중치를 적용한 다 익스트라 알고리즘을 통해 계산된 경유지와 도착지에 대한 관광지의 목록이 나오게 된다. 상단에는 관광지의 테마별 카테고리를 선택할 수 있도록 HorizontalScrollView안에 RadioGroup을 두어 선택할 수 있게 하였다. 관광지목록이 뜨는 것은 FrameLayout 안에 ListView를 두어 유동적으로 ListView안의 리스트가 변하는 것에 따라 목록이 바뀔 수 있도록했다.
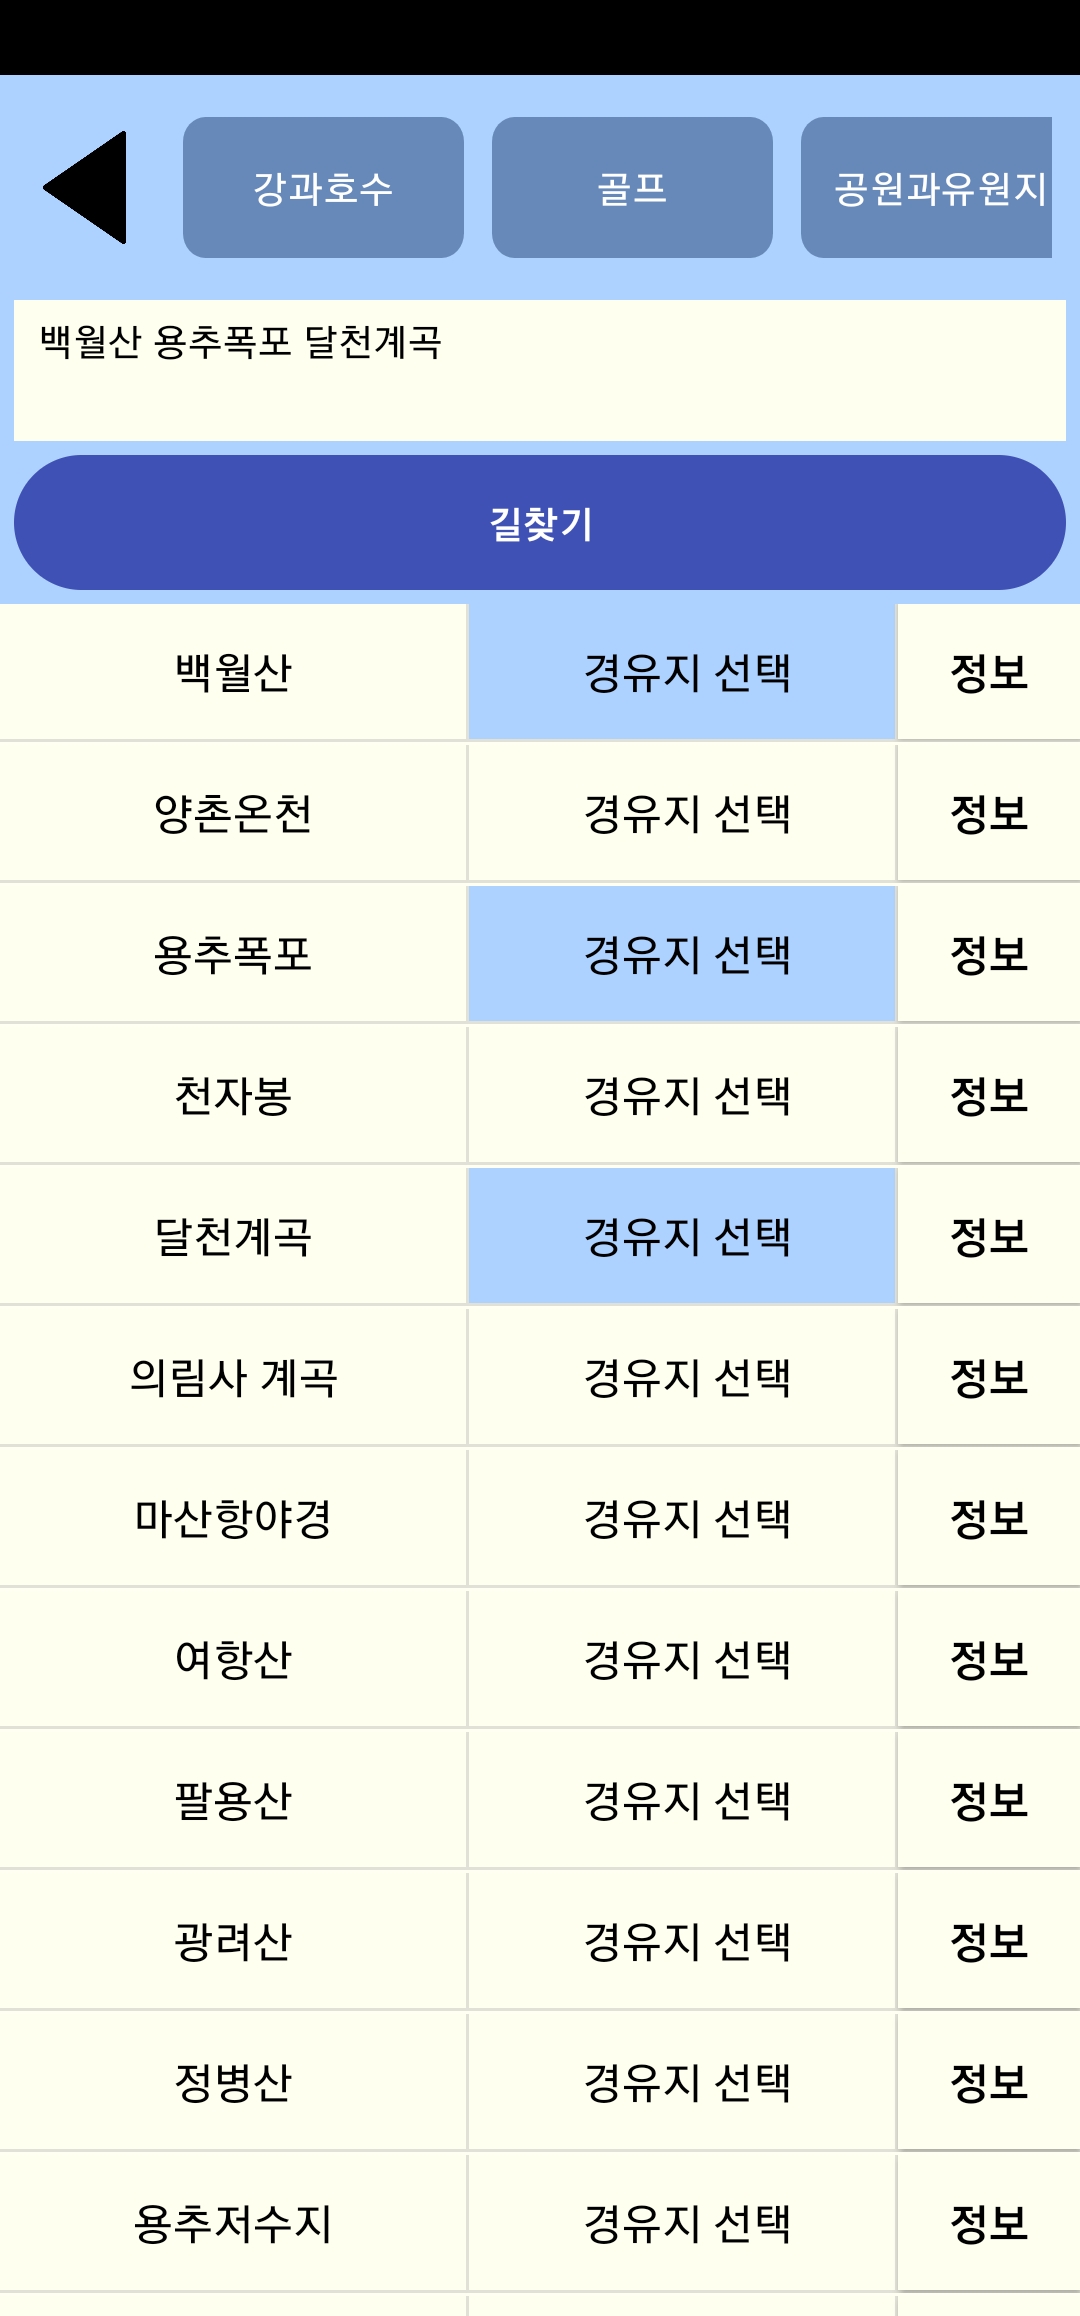
처음에는 관광지 선택과 정보보기 둘다 버튼으로 구현하려고 했지만 두개 다 버튼으로 구현했을 때 버튼의 Onclick 이벤트가 작동하지 않아서 관광지 선택은 TextView로 구현하고 리스트뷰를 클릭했을 때 인벤트가 작동하도록 만들어서 선택과 정보보기가 둘다 가능하도록 만들었다. 또한 선택했을 때 위의 Texview에 경유지가 추가되고 선택해제 했을 때 다시 없어질 수 있도록 구현 하였으면 이때 해당 관광지의 위경도 값도 같이 ArrayList에 추가하여 다음 지도표시화면에 사용할 수 있도록하였다.
int item_n=mid_data.indexOf(item);
double d1=Double.parseDouble(mid_lat.get(item_n));
result_lat.add(d1);
double d2=Double.parseDouble(mid_long.get(item_n));
result_long.add(d2);
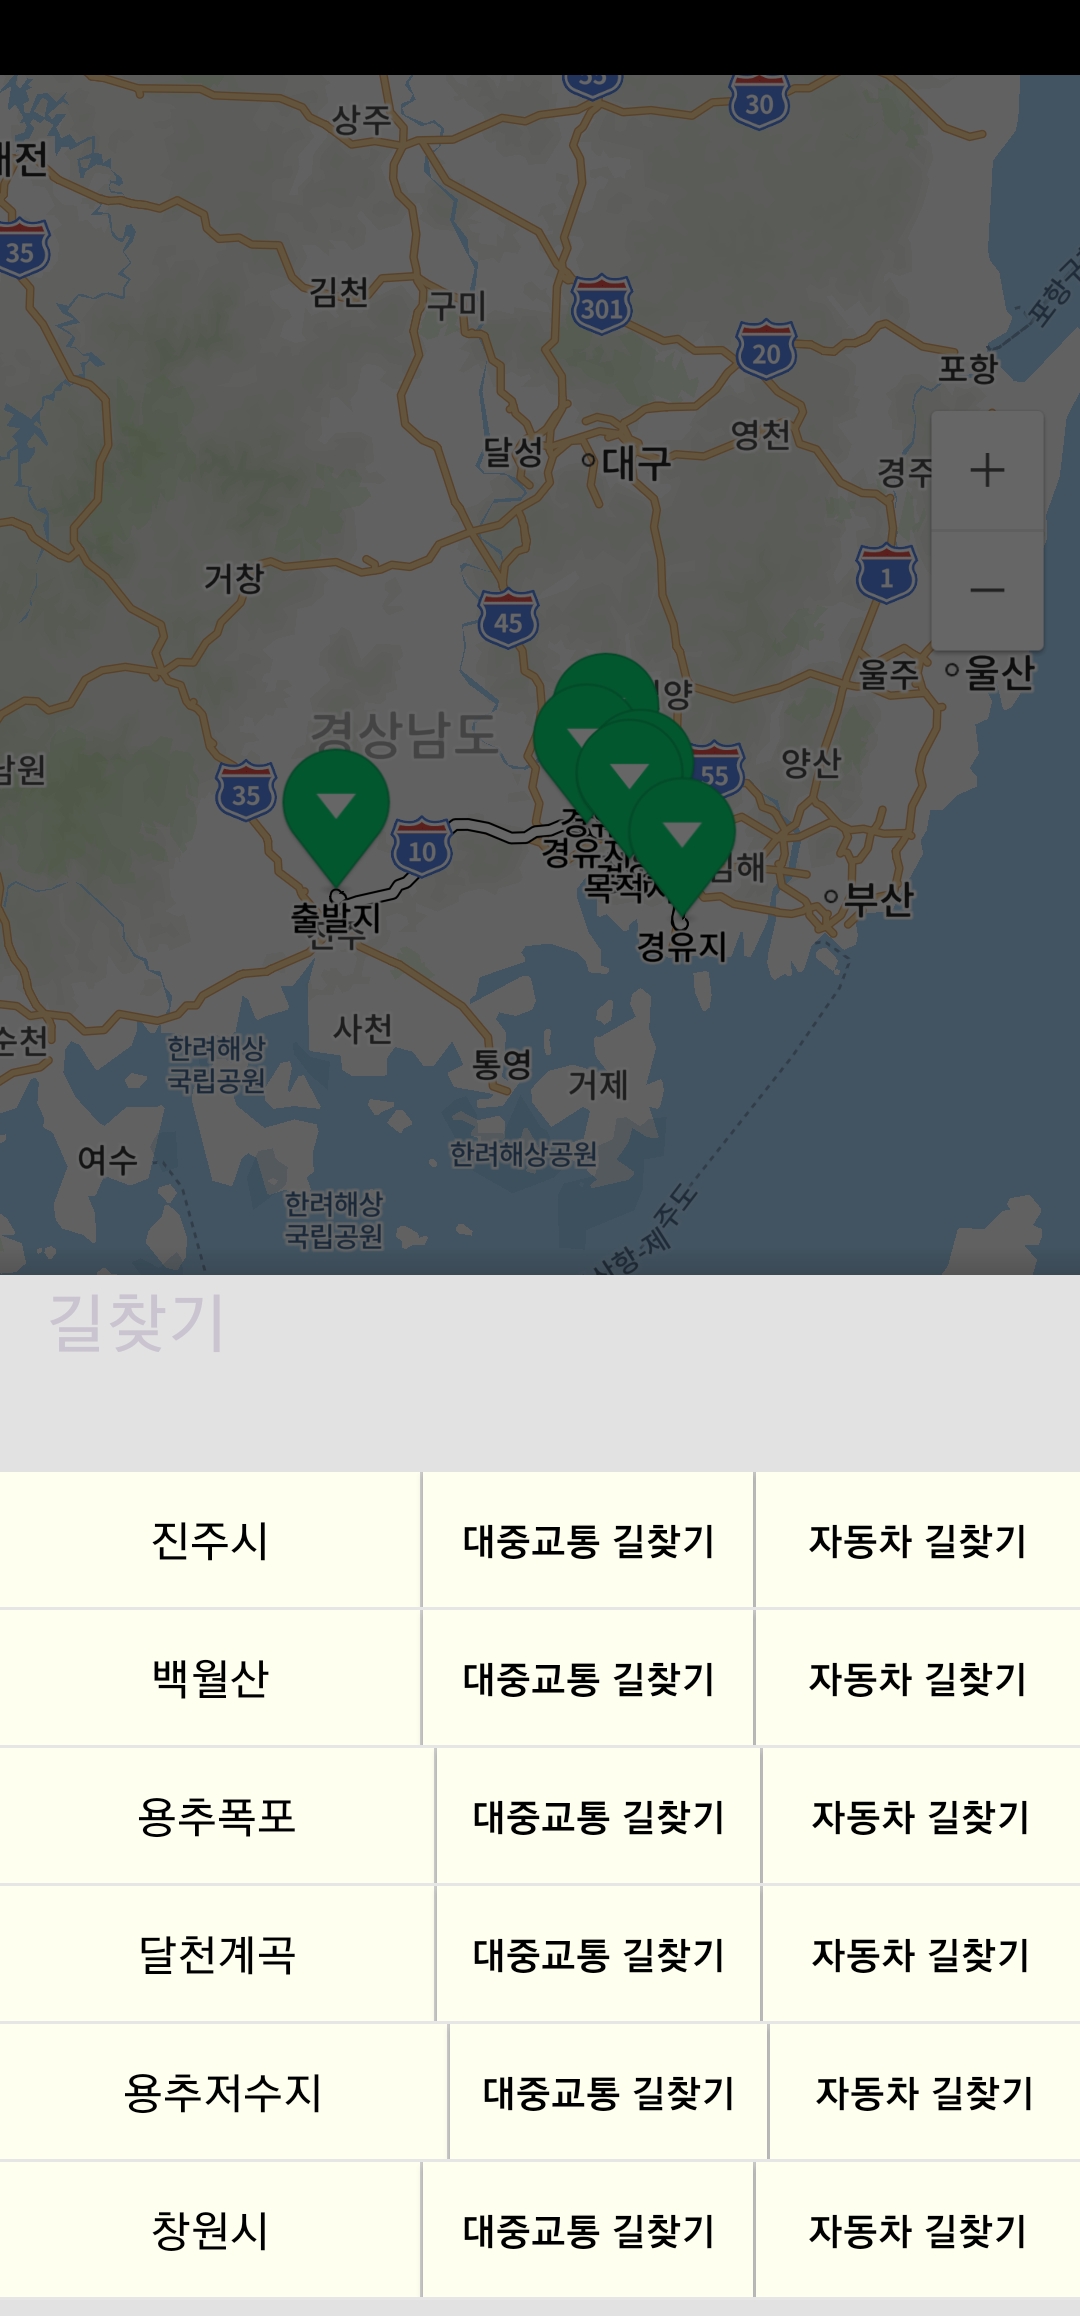
경유지와 출발지 도착지의 위경도 값을 전의 Activity에서 받은 뒤 Rest api로 Naver Map api중 하나인 Driving 5를 호출하여 지도 상에 길선을 그리고 마커를 찍는다.
-3-1지도기능
●Driving 5 Rest api에 관한 내용을 설명이 길어서 나중에 글을 작성할 예정이지만 여기서 짧게나마 설명하고 넘어가려고 한다. Rest api를 사용하는데 중요한 2가지 요소는 해당 서버에 Get요청을 넣을 Interface와 Get 요청을 했을 때 결과값을 받을 Class 이다. -1 Interface Interface는 보통 해당 api 공식문서에 보면 어떻게 적어야하는지 잘 나와있다. https://api.ncloud-docs.com/docs/ai-naver-mapsdirections-driving
Rest api를 호출할때는 Retrofit.Builder를 통하여 빌드하고 Get구문과 결과를 받을 Class를 작성하여 값을 받을 수 있게 한다. 또한 결과를 받는 값을 쓸 때는 response.body()를 통해 사용한다. 도로선을 맵에 사용할때는 path 즉 경로의 수만큼의 ArrrayList를 add하여 사용한다.
학기가 끝나고 방학 중 처음 개발했던 앱의 기능을 바탕으로 공모전에 나가기 위하여 기존의 팀원 중에 팀장을 비롯하여 개발을 주도적으로 했던 인원과 앱 개발을 해보고자하는 인원을 추가로 모아서 앱의 전반적인 디자인을 고치고 기존에 임의로 값을 적용했던 다 익스트라 알고리즘에서 공공데이터를 활용하여 가중치를 설정하고 이 데이터를 활용하여 앱의 기능 을 추가해보고자 했다.
개발 초기에는 학기 중에 개발을 해왔던 인원이고 개발을 해보고자 하는 인원이 있어서 위와 같은 문제점은 없었고 개발이 잘 진행되리라 생각을 했다.
2. 다시 소통의 문제
개발을 하면서 소통의 부재와 같은 문제점이 다시 생기기 시작하였고 나는 데이터를 활용하기위해 rest api와 같은 방법과 어떻게 데이터를 활용하고 쓸 것인가를 계속 찾아보면서 배우는 것에만 신경을 써서 각자의 업무에서의 현황등 개발과정에서의 애로사항이라던지 도움을 줄 수 있는 부분에 대해 알고자 소통을 하려고 하였지만 내 생각만큼 소통이 이루어지지 않았다.
하지만 나는 이 앱을 꼭 완성하고 싶었고 이 앱의 아이디어와 기능을 구현해낼 수 있다면 충분히 상을 탈 수 있다고 생각 했기에 팀장을 비롯하여 팀원들과 계속 개인적으로든 단체연락에서든 소통을 시도하였고 이 과정에서 어떤 부분이 지금 안되는지 어떤 부분에서 어떻게 하고 있는지 의견을 주고 받으면서 이 앱의 기능을 하나씩 완성해나가려 했다.
3. 그래도 무사히 제출
다행히 제출기간안에 앱의 주요 기능들을 완성할 수 있었지만 초기에 계획했던 식당, 축제 표시기능과 esg 지수를 보여주어 선택할 수 있게하는 등 여러기능들을 구현하지 못해서 아쉬웠다. 하지만 처음 만들어보는 앱이고 소재가 괜찮다고 생각해서 공모전에 떨어지더라도 이 앱은 추가기능을 남는 시간에라도 천천히라도 구현을 해서 제대로 된 앱을 만들어보고 싶어졌다.
이번에 앱 개발을 하고 공모전 준비를 해보면서 내가 아직 많이 부족하구나 라는 생각과 내가 모르는 부분이 있다면 검색이나 유투브등 다양한 경로를 통해서 찾다보면 찾을 수 있고 스스로 배워나갈 의지가 제일 중요하구나 라는 생각이 가장 많이 들었다. 앱을 만들든 게임을 만들든 가장 중요한 것은 일단 무엇이든 해보면서 내가 모르는 것이 있더라도 부딪혀보면서 몰랐던 것을 알아가면서 성장하면 되는 것이라고 생각해서 일단 무엇이든 할줄 아는 그런 행동력이다. 비록 소통의 문제라던지 문제를 정확히 파악하고 해결하는 것이 아닌 어영부영 하며 넘어가는 그러한 것으로 많이 부족한 앱을 만들어서 공모전에 내긴 했지만 이 앱을 개발하면서 이러한 기능을 어떻게 개발을 하고 어떤식으로 구현을 하면 되겠다라는 생각을 하고 실제로 코딩을 해보면서 정말 많이 배웠기 때문에 나는 얻은게 분명히 있다고 생각을 한다. 이러한 경험을 바탕으로 더 나은 앱, 게임을 만들어 볼 수 있는 사람이 돼가면 좋겠다.
● 나의 최종목표는 재미있는 게임을 만드는 것이였지만 직접 개발하여 무엇인가를 만들어 보고 싶었기에 학기 중 프로젝트로 관광앱을 만들어보려고 하였으며 만든 앱을 통하여 경상남도 소프트웨어 공모전에 나가보고자 했다.
그때는 처음으로 협엽을 통한 앱 개발 프로젝트를 해보는 것이라 미숙한 점과 어려웠던 점이 많았는데 크게 두가지 정도 문제점을 살펴보자면
1. 협업툴 사용의 미숙함
github와 notion 자주 써보지 않아서 처음에 앱을 빌드하고 협업 기획을 하는 데 초반 2~4주차를 협업툴의 설정과 기획에 써야했다.
2. 소통의 부재
카톡,디스코드 그리고 매주의 회의를 통해 소통을 통한 빠른 개발을 하려고 하였지만 생각만큼 소통이 원활하게 되지않았다.
이러한 문제점에서 협업툴같은 경우는 회의시간에 서로 가르쳐주며 맞춰나가면서 해결을 했는데 소통의 부재는 해결법을 찾기가 어려웠다. 학기 중에 앱 개발을 마쳐야하는 프로젝트였기에 팀장은 아니였지만 팀장과 함께 팀원들과 계속 소통하려고 노력하였으며 안되더라도 나의 개발할 부분을 최대한 빨리 끝내두고 안된 팀원의 부분을 돕거나 코드를 보고 필요하거나 더 개발할 부분을 개발하였다.
진행이 늦어지면서 처음 생각했던 기능들에서 구현 못한 부분이 많았지만 핵심기능인 길찾기 기능과 다익스트라 알고리즘을 사용한 관광 경유지 추천기능을 완성할 수 있었다.